In QuickBooks, it is pretty important to close entries at the end of the Fiscal year for efficient accounts management and prepare for the next coming year. The income and spending accounts must be transferred to the retained earnings account. There is no predetermined closing done at the end of the month or year in QuickBooks. However, a suitable QuickBooks closing entry at the end of the financial year is required to correctly keep the accounting records.
Furthermore, the data in QuickBooks is permanent and will not be destroyed unless you condense it. If the books are not correctly closed, it allows different users to go in and correct it. This article gives you a complete guide to QuickBooks Closing Entry and everything about this particular QuickBooks closing entry term.
Purpose of QuickBooks Closing Entry
The term “QuickBooks Closing Entries” refers to the process of balancing the company’s accounts. The transactions are kept track of to see if the company’s retained earnings account shows a legitimate gain in income over the previous year, as well as lower dividend payments and expenses.
While retained earnings are earnings that are kept for future investment in sales, advertising, equipment, and production and are not paid to shareholders in the form of dividends.
What do you Understand about the Income Summary Account?
The Income Summary Account is a temporary account that will be used during the closing process. The Revenues and Expenditure Account contains a company’s revenues and expenses for the current accounting period. In other words, it is through this account that we learn how much money we have after depreciation, business expenses, taxes, debt servicing expense, and other charges have been deducted.
Steps Need to Perform to Complete the QuickBooks Closing Entry at the Year-End
You can apply the below enumerated steps to successfully complete the close entries at the end of year:
Total Time: 30 minutes
Close Entries at the End of Year
💠 To begin with, check for revenue accounts in the Trial Balance, which contains the company’s revenue and capital accounts. There is a ‘credit balance’ indicated here, and you must make a ‘debit entry’ for each revenue account to zero it out. The credit balance will be transferred to the Income summary account as a result of this action.
💠 Next, look for a debit balance in the ‘Expense Accounts’ section of the Trial Balance. For each ‘Expense account,’ make a Credit item in the income summary account. The total in the Expense account should now be zero.
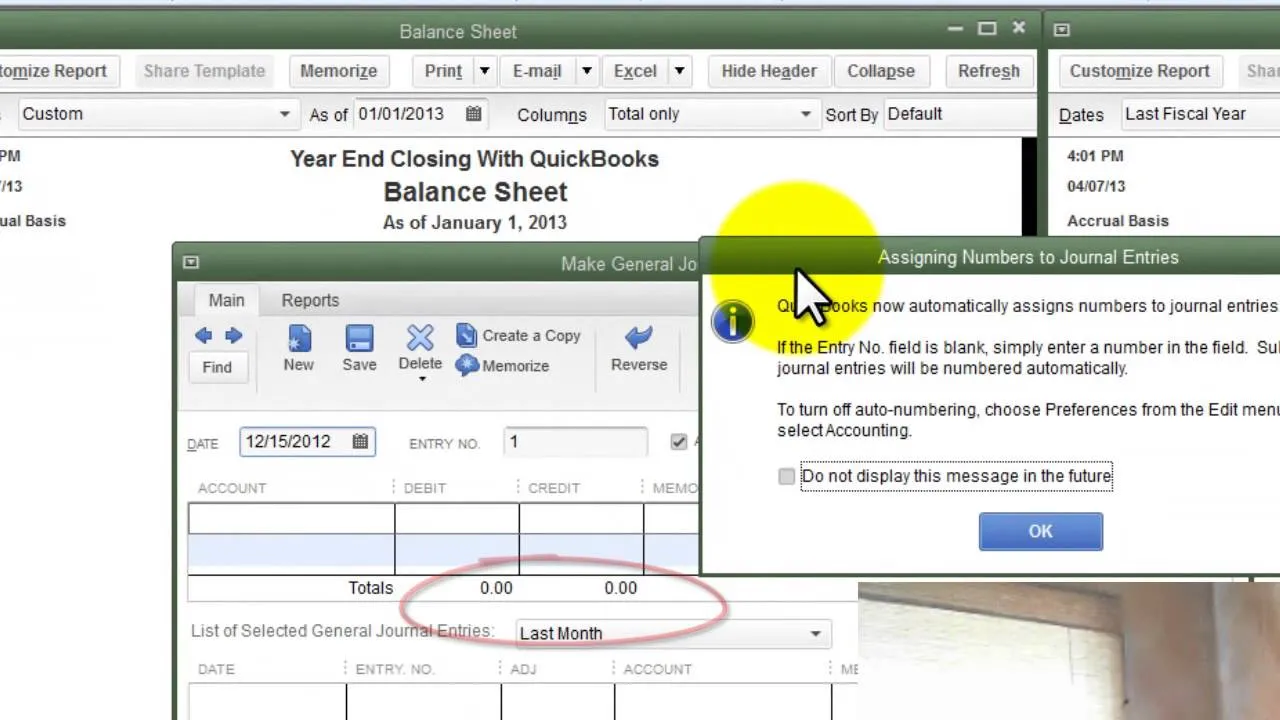
💠 There is Net Income if the Income Summary Account has a credit balance after all entries are completed, or if the Credit Entry amount is greater than the debit amount. On the other hand, if the debit amount exceeds the credits, you have a Net Loss. Make a journal entry that debits the Income Summary account and credits the Retained Earnings account to entirely close the Income Summary to the Retained Earnings account.
💠 Finally, the ‘Dividend account’ must be closed to retained earnings. The Dividend account has a typical debit balance, as you can see. As a result, credit the dividend account while debiting the retained earnings account.
💠 The amount of Net income that was given to it will be shown in the retained earnings.
Instructions to Amend Closing Date Mistakes in QuickBooks
💠 The accuracy of QuickBooks accounting books is mainly reliant on the accuracy with which the various transactions dates have been entered. Incorrect accounting books can result if there are any anomalies in the date input. You must complete certain processes for QuickBooks year-end closing to resolve this issue.
💠 To do so, you have to first set the closing date and password within the company preferences tab. Using or entering the password, you can see the previous year information. You just required logged-in them:
💠 Click the Edit tab
💠 Next, move to the Preferences to view the closing date option
💠 And then go to the Accounting Preferences tab and select “Company Preferences”
💠 At last, fill out the date & password that you have selected.
Reports Assist you to Troubleshoot the Mistakes Related to QuickBooks Closing Entry
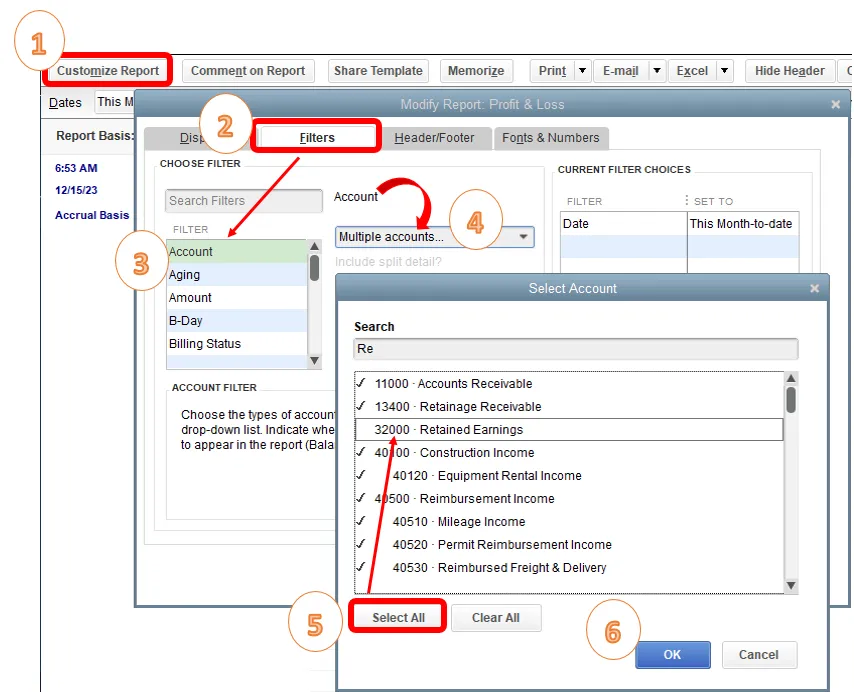
However, there are multiple reports that help you in troubleshooting in entering QuickBooks Opening Balances when you are unable to identify the problem. And these can be easily found by selecting the Reports menu, Accountant & Taxes.
So here are the four power reports, let’s know in detail
💠 Audit Trail report: This report contains all file transactions, changes in the history, deletions, and so forth. All of these consequences are displayed in the QuickBooks Audit Trail report if the User ID is set up for each user who enters transactions in QuickBooks. It’s simple to figure out who made what adjustments.
💠 The Closing Date Exception report: The report helps in the correction or locking of data files in order to prevent users from making any changes on or before a certain date. As a result, looking at this report allows you to quickly view any changes made on or before the Closing date.
💠 The Deleted Transactions report: For deleted or cancelled transactions, QuickBooks 2005 and newer versions create an activity log. If you’re looking for similar transactions, look no further than this report. To gain access to this, go to: When you double-click the Transaction, you’ll see all of the essential information.
💠 The Retained Earning Quick Report: In QuickBooks 2005 and later editions, the function is accessible. The information on the numerous exchanges that exist on the retained earnings is shown in the report.
Accessibility Steps of this QuickBooks Report
💠 Simply, press the Lists menu
💠 Look for the COA option
💠 Make a double-click on the “Retained Earning”
💠 Finally, view the passages that are mistakenly done to the retained earnings account and double-click on the section to edit and revise the same.
Important Tasks should be done at the Year-End
It’s essentially important to do specified procedures throughout the year to achieve an error-free QuickBooks year-end close. Here is a checklist of things you should do before closing QuickBooks. Meanwhile, make sure you complete the following duties.
💠 Review the ‘working trial balance’ to see what changes were made in the preceding year that affected retained earnings
💠 Examine and evaluate the COA for any recent modifications or redundant records
💠 Next thing is to review the Accounts Payable
💠 Review the Vendors and Customers for missing data, errors, and other issues to see
💠 Check out the Payroll Item Setup and the Payroll Transactions.
💠 Examine the Audit Trail report for any suspicious or altered exchanges.
💠 Review the amounts, set up the inventory items, and so forth.
💠 Examine any earnings that have been set aside. Quickly check for any modifications from the previous year’s closing, as well as any paragraphs added specifically to that record.
💠 Use the Clean-Up data utility tool to clean up your data.
💠 Perform a physical count of the stock on the last day and make any necessary inventory adjustments.
💠 View the year’s most important reports, such as the cash flow statement, the profit and loss statement, the balance sheet, and so on.
💠 Send a duplicate of the IRS 1099 to all qualifying merchants.
💠 Make a copy of your data on a different hard drive. This can be accomplished via the server or QuickBooks Online Backup.
Preparation for the Next Coming New Year:
It is equally important to close your books efficiently than planning for the next coming year. To plan for the coming year, you can utilize QuickBooks capabilities like the Cash flow projector, business plan tool, budgeting, and so on. These tools are important for managing accounts in the future year and to keep everything organized in a well defined manner.
Final Words:
This concludes the article with a complete guide to QuickBooks Closing Entry. You now understand how essential it is to properly Close Entry in QuickBooks at the end of the year. Hopefully, this article has given you enough information to comprehend all the aspects of QuickBooks closing entry and its management.
Frequently Asked Questions
What is the term “Automatic Year-End Adjustments from QuickBooks”?
It is nothing but simply based on the fiscal year’s start month. The aim of this program is to adjust your income and expense accounts to zero them out. In this way, it lets you start a new fiscal year with zero net income. The equity section of the balance sheet will show a line for net income, on the last day of the fiscal year
What are the advantages of closing your books in QuickBooks at the end of the year?
With a proper closing of your books gives you many benefits like restricted access where you can create a closing date password to restrict the access of your data from the previous accounting period including the detail of every transaction. Next benefit is reporting where any changes made after the closing date to transactions dated on or before the closing date will appear in the Closing Date Exception Report, and many more benefits you will get.