QuickBooks Company file obtains the financial information and data of a company, it’s necessary to keep a backup. You can make daily backups of your company files with QuickBooks. It ensures that you still have this simple recently with options for setting backup alert frequency, formatting and disk during backup, scheduling backup, checking the quality of data at set intervals. You can choose to either upgrade the file or recognize if you want to start a new company file over the old file. It’s suggested that you backup your data files at the end of the month, regular or at-least. In this post, we are going to discuss how you can easily create Company file & backup in QuickBooks Desktop. For more information, you can connect with the team via email or live chat.
2 Methods to Create a New QuickBooks Desktop Company File
There are two ways you can easily create a new QuickBooks company file either using the “Express Start” or “Detailed Start” method. The methods are discussed below, you can easily follow the steps involves:
Important Note: Choose different names for existing company files, and you might be creating a new one company file. If the same is used then the current business file would be overridden.
Total Time: 37 minutes
Using “Express Start” Method
🔷 Initially, create a new company file
🔷 Next, click the “Express Start” button
🔷 Now, enter the required information in the relevant “QuickBooks Setup”
🔷 Also, you can present Chart of Accounts (COA) that QuickBooks creates as per the industry
🔷 Before that, select “Help me choose” to find the description for every business type
🔷 Once done with that then click on the “Create Company”
🔷 When you create the company file then create a chart of accounts (COAs), customers & services
🔷 Finally, choose the “Start working” option.
Using “Detailed Start” Method
🔷 Firstly, open QuickBooks Desktop
🔷 Next, go to the “No Company Open window”
🔷 Now, select the option named “Create a new company”
🔷 After that, select and click on the “Detailed Start” option
🔷 Complete the “Easy Step Interview” screen
🔷 Once done with that, click “Next” button
🔷 Now, choose the appropriate industry and then hit “Next” button
🔷 Next, recognize the “Business Entity” and then hit “Next” button again
🔷 Moving forward, you have to set the appropriate Fiscal year (in which you want to create a company file)
🔷 Again select “Next” button
🔷 Select the location in order to save the company file
🔷 Then hit Save button
🔷 Customize the QuickBooks just by selecting “Next” button
🔷 Later, you can perform by selecting the “Leave” button.
Steps for Create a QuickBooks Desktop Company File Backup
You can either manually back up the QuickBooks company file or you can choose to create an automatic backup procedure. Let’s discuss both of them in the following steps:
Create a Company Data File Backup Manually
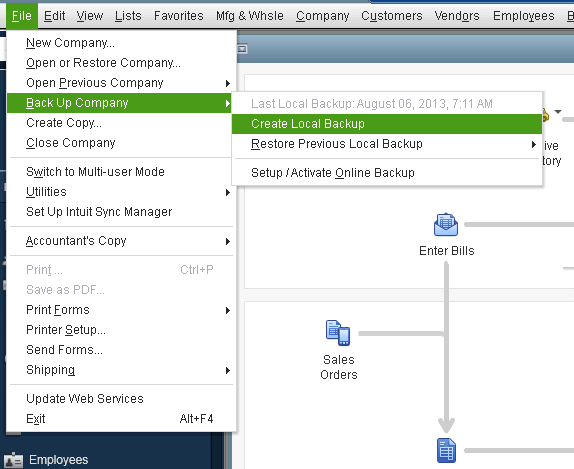
🔷 The very first, go to File menu and then select the Backup option
🔷 Next, select the option named “Backup Company File”
🔷 Now, click on the Browse button and rename the filename
🔷 After that, describe the location of the backup
🔷 Select and click on the Save button
🔷 To proceed further, choose other items in “Backup Options” (Optional)
🔷 At last, hit the “Ok” button.
If you find it difficult to back up directly to a CD-R or CD-RW disk, back up to your hard drive first. Instead use the windows explorer or the “burner” program on your PC to back up the file to CD.
Create a Company Data File Backup Automatically
There are two methods to create an automate backup of a company data file:
1st Method
The first method creates a backup file, once you close the file. You set the frequency on how often backup is created by QuickBooks. QuickBooks will store this backup file on your hard drive in a folder called “Auto Backup” under QuickBooks directory.
🔷 Initially, go to the File menu
🔷 Next, choose the Backup option
🔷 After that, select the option named “Schedule a Backup”
🔷 Now, select the option “Save automatically when closing the data file.”
🔷 Fill out the appropriate frequency of backups.
🔷 When you done with that, select the appropriate selections within the QuickBooks Backup
Finally, hit the “Ok” button.
2nd Method
The second approach helps you to arrange a backup with no attendance. This means that you don’t have to work at QuickBooks, or even on your system. This backup file can only be saved on a hard drive locally or on a network. During a planned backup the company file has to be closed.
🔷 Firstly, go to the File menu
🔷 Next, select and click on the Backup option
🔷 Now, select “Schedule Backup” option
🔷 After that, hit on the “New” button
🔷 Choose the appropriate “Schedule Backup” option.
🔷 To save the new schedule, click on the “Ok” button at the end.
Backup and Restore a Company File in Quickbooks Desktop – Video Guide
Still seeking for assistance
So, this post ends here with a hope that you’ll get clear insights to create QuickBooks Company File & Backup in QuickBooks Desktop. It is expected that now it is easy for you to create a desktop company file and develop backups in QuickBooks.
In any case, if you find difficulty in performing the above-mentioned steps then it is recommended you to connect with the accountingguide.co team. You can connect them via dropping an email at support@apropayroll.com or do a 24*7 live chat with dedicated experts. You can also fill up the customer contact form along with query details and the team will get back to you or they may take 2-3 hours.