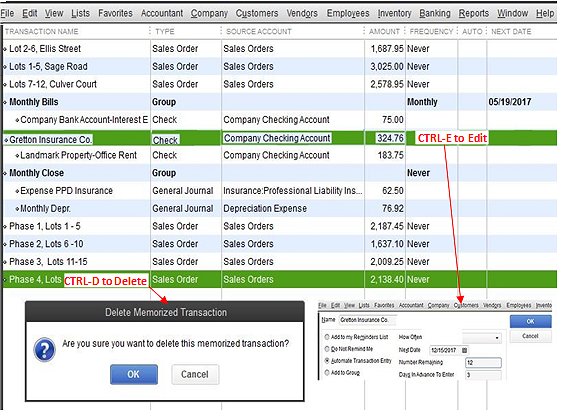
Entering data on a regular basis usually takes a lot of time and there are many times when you miss out to make entries. In order to avoid such mistakes, the QuickBooks Memorized Transaction feature has been introduced in QuickBooks. Setting a reminder for an accurate transaction is pretty simple to use and very convenient. Memorized Transaction is nothing but a solution to your repetitive data entry method so that you can save both time and effort as well. Furthermore, you can explore this article to get additional information and a complete guide to create & modify QuickBooks Memorized Transaction.

Features of QuickBooks Memorized Transaction
- Reduces mistakes
- Saves time
- Increase your bookkeeping accuracy
You can memorize for the following transactions:
- Vendor bills
- Sales orders
- Customer invoices
- Purchase orders
- Deposits
- Credit Card Charges
- Transfers
- Cheques
- Journal entries
Read Also : How to Set up Automate Payments in Quickbooks
Step by Step Instructions to Create Memorized Transaction in QuickBooks
💠 Initially, enter your transaction
💠 Next, go to the Edit menu and select Memorize
💠 Enter your memorized transaction name
Total Time: 35 minutes
Add to My Reminder List:
💠 To the reminder list, add a memorized transaction
💠 Fill in the reminder as much as you want
💠 For the due transaction, fill out the next transaction date.
Use Don’t Remind Me:
Pick Do Not Remind Me if you don’t want the transaction to be memorized.
Automatic Transaction Entry:
With this option, when the transaction is due, QuickBooks will automatically enter the information automatically.
💠 Fill in how much you want an entry for the transaction.
💠 For a due transaction, enter Next Date.
Reminders:
💠 Make sure that your Next Date due to its Automated Calendar is scheduled for a day in the future
💠 Note that it includes a Next Date transaction when you fill in the Number Remaining field
💠 In the Transaction, if you want to enter other necessary details, enter it, and then click Ok
💠 To enter the memorized transaction now, press Save & Close or Save & Next
💠 Select and close the window by choosing a transparent button
💠 If you just enter details on the transaction for future use.
QuickBooks Memorized Transaction Update Steps
💠 Click the List menu at the beginning and select the Memorized Transactions list.
💠 Make a double-click on the recommended memorized transaction
💠 Do modifications to your transactions as you required
💠 Next, press the Close followed by Save
💠 Choose next in order to enter the memorized transaction.
Ways to Create a Memorized Transaction Group
💠 Go to the List menu and select the list of Memorized Transactions
💠 From the pop-up menu, select New Group
💠 After that, fill the group name and choose Action as well as a date option
💠 In the end, press the Ok button.
Steps to Add a Transaction to a Memorized Transaction Group
💠 Open the transaction you’d like to memorize
💠 Choose Memorized option
💠 Now, select Add to a group as well as enter a group name
💠 Finally, press Ok in order to complete the process and save it.
Process to Edit or Delete Memorized Transactions in QuickBooks
Once you have finished setting up the operation, if you want to edit and delete schedule details or action information in the future
💠 Go to the Memorized QuickBooks list
💠 After that, select the button for Editing
💠 Edit and press the Memorize button again if you need to update the actual memorized transaction information
💠 Now open the pop-up on your computer and ask if you want to substitute or make a new transaction for the existing memorized transaction.
Also Read : Delete QuickBooks Generated Zero Amount Transaction
How to create memorized transactions in QuickBooks Desktop
Conclusion
So, the above is the complete guide to create & modify QuickBooks Memorized Transaction. By using this feature, you save you quality time and utilize it in other productive work. With this guide, you can easily build your entry with just a single click because it is very easy to access Memorized Transaction in QuickBooks. If you still need assistance then feel free to connect with QuickBooks technical support Toll-free helpdesk number . You can send an email at support@apropayroll.com or do a QuickBooks live chat.
