Users of QuickBooks can make use of the QuickBooks Class Tracking feature. Users using this feature will be able to print reports that provide class-by-class expenditures and revenue. In general, classes display divisions within a company. Class tracking for QuickBooks is a useful tool. Go through the following blog to learn more about how to use QuickBooks class tracking in detail.

Insights into QuickBooks Class Tracking
QuickBooks class tracking lets you track individual expenses and categorize mutual expenditures beyond multiple accounts. You can arrange classes for certain transactions that you think are important to the community through QuickBooks Online class monitoring. By doing so, by the location, department, business office, or any other breakdown of your business, you would be able to monitor account balances.
There are certain things that need to consider while using QuickBooks class tracking:
- Allocating a class to any posting transaction is important. So, you can organize everything seamlessly into a definite class.
- Before you generate reports, ensure that all the transactions must have been allocated. It is recommended that you run unclassified reports on gains and losses.
- In QuickBooks version 2011 or later, you can also maintain a balance sheet per class.
- You will also get a “Turn on Class Monitoring” feature at QuickBooks. Without worrying, you should toggle this feature on, as it won’t affect your file reports and previous transactions.
Also Read : Use QuickBooks Budgets and Forecast Reports to Track Company Growth
Step by Step Instructions to Turn on Class Tracking in QuickBooks
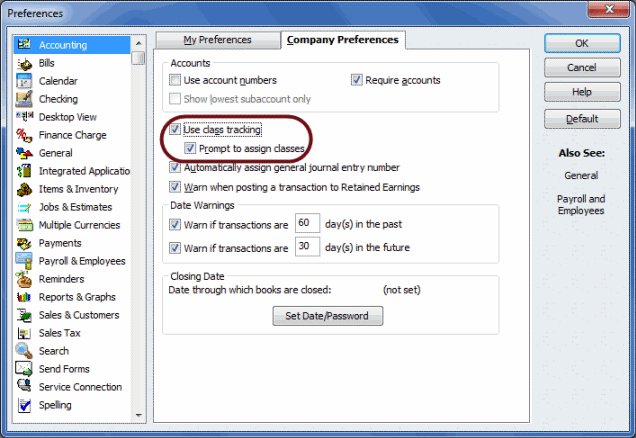
💠 Initially, go to the “Preferences” section which you find in the Edit menu
💠 Next, select the Accounting icon
💠 Now, move to the Company Preferences
💠 After that, click the box named “Use Tracking”
💠 Then hit “Ok” and move to the Menu section
💠 Choose the lists that are of interest to you
💠 Hit the “New” option in order to create a new class
💠 Once done with that then you need to create a class for desired expenses
💠 At last, fill out the name related to the class to end this process.
Total Time: 35 minutes
Steps to Put Classes to Work
💠 Now, when it comes to your purchases, you can completely use the classes.
🔶 First of all, you will need to open a blank invoice and then select a customer
🔶 The class field will be placed just next to the name of the customer
🔶 If an invoice is assigned to the same class in its entirety, you must click on the drop-down list and then select any invoice that is of interest to you
🔶 You may also separately assign different classes to each of the objects in the line.
💠 Make a note of the fact that not all invoice models have a class column.
🔶 However, you can add templates by selecting the invoice form you want to change and then clicking on the ‘Customize’ option in the toolbar
🔶 After the previous process has been completed, once the Customization Data Layout window opens, you can add classes under the section of Columns
💠 QuickBooks offers two reports to its users that are explicitly designed to monitor transactions based on class. Those two records are the balance sheet by class benefit & loss.
🔶 In the Reports menu under the ‘Company & Financial’ heading, you can find both of the reports
🔶 In addition, in order to integrate a class column, you can filter other reports
🔶 For individual classes, you can make a Quick Report as well
🔶 You must navigate to the ‘Lists’ sections in order to do this, then to the “Class List” menu, and then pick a report or graph.
Read Also : How to Modify/Customize QuickBooks Custom Reports
Ways to Create Class Types in QuickBooks
The type generation process is nearly identical to the formation of groups. To build forms, the steps are as follows:
💠 Navigate to the Lists section, then the Customer & Vendor Profile Lists, and pick the “form” you want.
💠 Here, as you did when classes were developed, you will have to follow the same instructions.
💠 In addition,’ forms’ in each of the transactions are not included. They are primarily created for your own personal use and are preserved in your files.
By doing the above procedure, you can make the process for class monitoring much more streamlined!
How to Use Class Tracking in Quickbooks – Video Tutorial
Conclusion
Class tracking in QuickBooks lets you group transactions intelligently and according to the divisions where the transactions are located. With the help of this article, you can easily understand how to use QuickBooks Class Tracking. For more queries or information, you can reach out to the team of experts via QuickBooks technical support Toll-free number . You can also email at support@apropayroll.com or do a QuickBooks live chat with dedicated experts.
