Undoubtedly, QuickBooks is one of the highly user-friendly accounting solutions that help millions of users to streamline their account activity with much ease. However, it happens when users encounter some unwanted delays due to some unwanted errors. QuickBooks Display issue is one such issue that users usually encounter due to graphics display. It can cause with the high-resolution graphics displays (screen resolution: 1920 X 1200 or higher) the application faces display problems. This problem also arises when you overuse any QuickBooks product. Display problems in the QuickBooks Desktop involve the big and small issues while accessing the screen of the program. We are going to disclose some major display issues in this post and fix them using intelligible methods for troubleshooting. You can also contact the team for further assistance.
Reasons that Arises QuickBooks Display Issues
QuickBooks is built and coded for less than 100% (96 DPI) DPI value. Many devices with a higher resolution display consist of 125 to 150% DPI Settings which lead display issues in QB Desktop.
Signs & Symptoms of QuickBooks Display Error
It is necessary to have proper Microsoft Windows resolution and Font settings for better performance of QuickBooks display. However, if these two criteria are not optimized on a timely basis then you can check the below-mentioned symptoms:
- Huge fonts size
- Home page is blank
- Missing buttons
- The transaction form is not appropriate for the screen
- Sizing icon does not reflect at the top right window
- A field overwrites and hides the label thereof
- Distorted screen when attempting to maximize it or to minimize it
- The pay status on the Invoices is truncated.
Solutions to Fix QuickBooks Display Issues
Now, you are well aware of the reasons and symptoms of the error. Check out here are all the appropriate and easy-to-apply solutions for how to fix QuickBooks display issues:-
Total Time: 35 minutes
Modify DPI Settings
💠 Initially, go to QuickBooks icon and right-click on it
💠 Next, select the “disable display scaling on higher DPI setting”
💠 The above option you can find in the Compatibility tab
💠 After that, hit “Apply” and “Ok” button
💠 At last, open QuickBooks and check whether the Windows are visible or not.
Modify Desktop View Preference
💠 Firstly, go to “Company” and open it
💠 Next, select the Edit menu and then click on “preferences’
💠 After that click on the Desktop View and then My Preferences
💠 In the end, go to Switch view and select “Multiple Windows to one”.
Modify Windows DPI Settings
Changing the DPI settings is important because QuickBooks is programmed to operate with Windows DPI’s ‘Default Settings.’ And if you use something other than Standard values, it will cause issues to be displayed.
💠 Windows 10
🔹 The very first, go to Control Panel and then Press Windows + X keys together
🔹 Next, select and click on the “Appearance & Personalization”
🔹 Click on the “Set custom scaling” after browsing the “change item size” option
🔹 Now, with the help of the drop-down menu, choose 100%
🔹 And then press the “Ok” button
🔹 Otherwise, drag right/left in order to adjust the settings
🔹 At last, press the “Apply” and then sign out so that it reflects all the changes made.
💠 Windows 8/8.1
🔹 Initially, go to Desktop and right-click on it to select “Screen”
🔹 Next, go to display settings and select “Make text & other items bigger or smaller”
🔹 Unmark the option named “allow me to select one scaling level for my displays” without missing
🔹 Drag the slider to choose less than 100% and this ensures you that the items are at a normal
🔹 Finally, save all the changes and then reboot the system to reflect all the changes made.
💠 Windows 7
🔹 Select the “Screen” by right-clicking on the Desktop
🔹 Open display settings and then select “make text & items larger”
🔹 Set the option smaller than 100% and this keep the items in a normal text mode
🔹 At last, save all the activity and reboot your system to effect the changes made.
Change Windows Theme to “Basic”
💠 Go to Windows Start button
💠 Next, click on the “Control Panel”
💠 After that, select Personalization
💠 Now, select and click on the “Windows 7 basic” in the “Basic & High Contrast themes”
💠 Try to start the computer once again
💠 Launch the QuickBooks and verify the error is resolved or still exists.
Reboot.bat
💠 Go to QuickBooks icon and right-click on it
💠 Next, open the file location
💠 Look for the “bat files” and once find then right-click on it
💠 Now, select run as an Admin
💠 Make sure that you have the Admin rights to run the “bat files”
💠 Now, file display bat or reboot
💠 You can see a black window appear with the scrolling name
💠 Once the utility of bat file has completed then it will close automatically
💠 Make a note that, you do not close it manually
💠 Verify the issue is resolved or else you can restart the system.
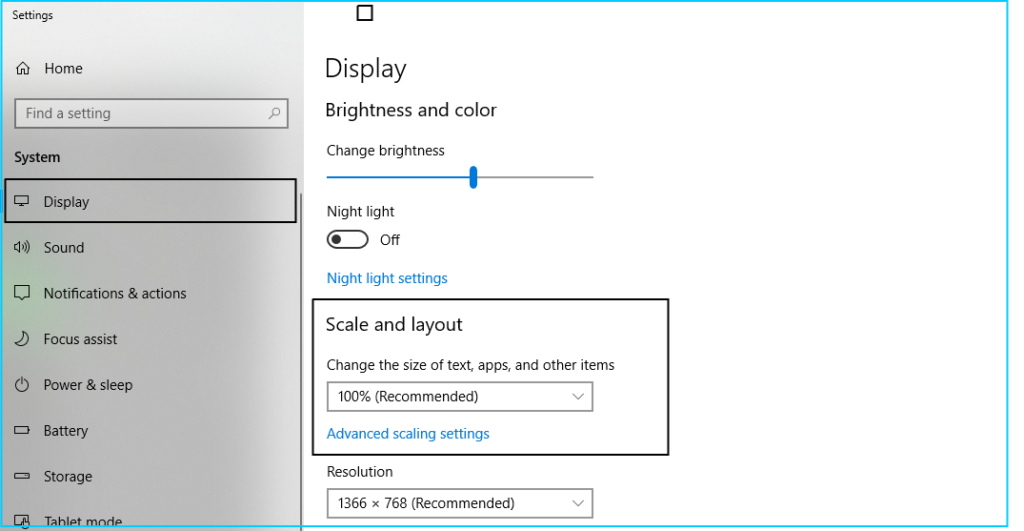
Modify the Settings of Screen Resolution
💠 Windows 10
🔹 Go to the “Desktop” and right-click on it to select “Display”
🔹 Next, select the “Advanced display settings”
🔹 Now, in case there is more than 1 display appear then select “display that need to modify”
🔹 After that, go to “Resolution section” and set it to minimum 1024 x 768 or higher
🔹 At last, hit the “Apply” button and then “Keep the changes”.
💠 Windows 8/8.1/7
🔹 Right-click on the Desktop and then select “screen”
🔹 Using the drop-down menu, look for the resolution
🔹 Set it to a minimum of 1024 x 768 or higher than that.
🔹 In the end, press the “Ok” button.
Still looking for assistance
So, the above-mentioned are all possible solutions to fix QuickBooks display issues. It is expected that the above comprehensive solutions help you to comfortably be able to resolve the error.
In any case, you face difficulty in determining the issues then feel free to connect with the QuickBooks technical support team via email support@apropayroll.com or do a 24*7 live chat. You can also connect with the team by filling the customer contact form with the query details and the team will get back to you in the minimum time frame or they may 2-3 hours.