Sage 50 is one of the best accounting software available in the market that is created to guide your business efficiently through all its financial and accounting processes. Not only does the program allows you to manage your invoices, cash flows, inventories and taxes, but it also allows you to streamline your payroll process to save time and reduce human errors as much as possible.
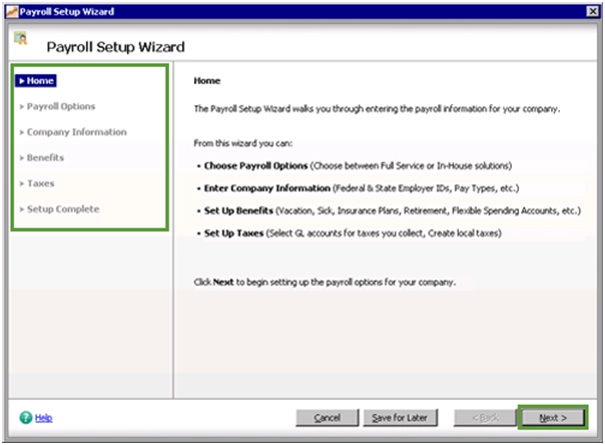
Before you are able to process payroll transactions using Sage 50, you first need to complete the Payroll Setup wizard in Sage 50. This posttakes you through the steps to using the Payroll Setup wizard so that you know the information you need when you set up payroll options for your business.
Related article: Sage 50 2021 Payroll Update Error
How to Setup the Payroll Module in Sage?l
Setting up the payroll module in Sage may seem like a lengthy process but it is extremely efficient and effective if you follow the below-mentioned guidelines accurately. In this section, we will take you through various steps of setting up the payroll, creating a new payroll income, creating a new payroll deduction, setting up payroll taxes, setting up payroll remittance, creating an employee, and making a paycheck.
Step 1: Setting up the Payroll
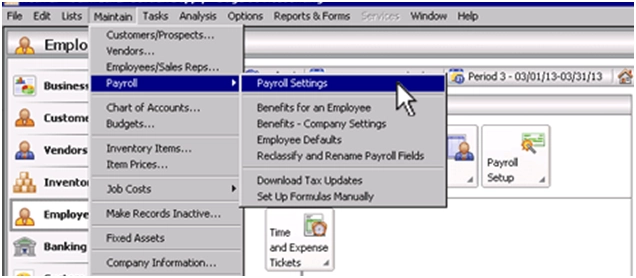
💠 Select Setup, Settings, Payroll, then Linked Accounts.
💠 For each subsection (Incomes, Deductions, Taxes, etc.) Verify that there is an account for every field.
Note: If unsure, then please ask your accountant for proper guidance of which account to select.
💠 Select OK.
💠 Select Setup, Settings, Payroll, then Incomes.
💠 Verify that each income is properly setup for taxes.
💠 For vacation to be calculated, select a liability account in Vac. Owed section
Note: If unsure, then please ask your accountant for proper guidance of which account to select.
💠 Select Deductions and verify deductions used are properly setup.
💠 Select Taxes and input the proper percentage rates for each additional taxes.
💠 Select OK.
Step 2: To Create a New Payroll Income
💠 Select Setup, then Settings
💠 Select Payroll, then Income
💠 Rename the next available Income to the one you want to create.
💠 You may change the type of the income as appropriate (Income, Hourly Rate) and also put a check mark in the appropriate taxes columns
💠 Select Linked Accounts, Payroll, then Income and you will see the New Income in the column below. You will need to link it to your Wages account. (If you want to link the New Income to a different Expense account, you may do so as well)
💠 Open the Employee Record put a check mark in the Use column beside the New Income and the appropriate rate for the Income.
Step 3: To Create a New Payroll Deduction
💠 Select Setup, then Settings
💠 Select Payroll, then Deductions.
💠 Rename the next available Deduction to the one you want to create.
💠 You may change the type of the deduction as appropriate in the Deduct By column (Amount or Percentage of Gross).
💠 You may choose to apply this deduction either before or after the taxes are applied. If you want this deduction to be taken off on your Gross, you must leave the columns unchecked. If you want this deduction to be taken off your Net, you must check the columns apply.
💠 Select Setup, Settings, Payroll, then Linked Accounts
💠 Select the Payroll Deductions tab and you will see the new deduction in the column below. You will need to link it to either a Payables or Expense account.
💠 Open the Employee Record put a check mark in the Use column beside the New Deduction and the suitable rate for the Deduction.
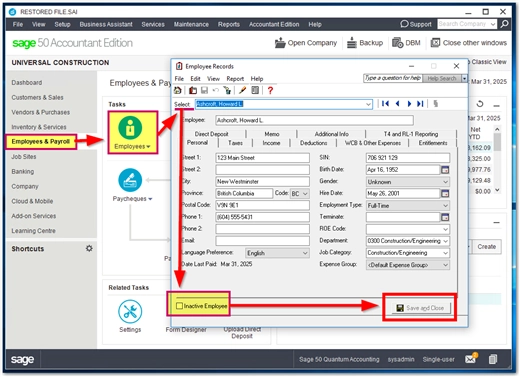
Step 4: Create an Employee
💠 Under the Employees icon, select the Employees link, then select Add Employee.
💠 Fill in all the information for each employee and for every tab.
💠 Select Save and Close.
💠 Repeat this for each additional employee.
Step 5: Make a Paycheque
💠 Under the Paycheque icon, select the Paycheque link
💠 Select Create Paycheque.
💠 Select the employee.
💠 Select the Cheque Date and Period End Date.
💠 Fill in the paycheque information as required.
💠 If everything look ok, then click the Print button (optional) if you wish to print a paycheque.
💠 Select Process.
💠 Repeat for the next employee.
Also Read: How to Fix Sage 50 Payroll Error 2003
Final Words!

We hope that the solution provided above helps you properly set up the payroll module in Sage. However, if you face any problems or get stuck somewhere in the process, please give a call to our highly trained Sage experts who work round the clock to make your experience hassle-free.
💠Frequently Asked Questions💠
Q1. How can I Set up Payroll Remittance in Sage 50?
Ans: To set up payroll remittance in Sage 50, you have to do the following:
💠 Select Vendors and create the Receiver General record if it does not exist.
💠 Select Setup, Settings, then Payroll Remittance.
💠 Link the EI, CPP and Tax to the Receiver General vendor by clicking on the magnifying icon in the Remittance Vendor column.
💠 Select Receiver General.
💠 If you are using Sage Simply Accounting 2011 or earlier version: In the Balance Forward Date column enter the end date of the last remittance period paid. Otherwise skip to next step .
💠 In the Balance Forward column enter any amount still owing as of that date.
💠 If you are using Sage Simply Accounting 2012 & Sage 50 2013 or higher: Enter the Remittance Frequency.
💠 Enter the End of Next Remitting Period.
💠 Select OK to save.
💠 To confirm the amounts that need to be remitted check the general ledger report through Reports, Financials, General Ledger Report.
💠 Ensure the dates you are using are for the same period you are remitting for.
💠 If you are setting up remittance for Worker’s Compensation (WCB, CSST, etc.) please follow the same steps above.
Q2. How Can I Setup Payroll Taxes is Sage 50?
Ans: To setup payroll taxes, you have to:
💠 Select Setup, Settings
💠 Select Payroll, Linked Accounts, Taxes
💠 Link the accounts to payable and expenses.
💠 For Quebec employees please also link payables and expense accounts to Tax(Que), QPP, QHSF, QPIP.
💠 If you have an active Payroll ID in the program and have clicked on “calculate taxes automatically” button on the paycheque screen, the payroll tax amount will show up automatically after you enter any incomes or deductions.
💠 You can only use Payroll Cheque Run feature when you have any active Payroll ID.