QuickBooks Desktop play a vital role in terms of overcoming the problems related to accounting and bookkeeping with useful features. Above all, it offers you an advanced time tracking feature that helps you in getting rid of many problems that you might face while using the software. This feature mainly allows you to set up employee hours, add to your invoices, and clock billable information with ease. To explore more about how to time tracking in QuickBooks Desktop then go through this ultimate blog post as it discloses all the relevant information.

Benefits of Time Tracking in QuickBooks Desktop
- Capture every billable moment from a browser or Smartphone on any track.
- One-click integration of time tracking from QuickBooks.
- Study and authorize timesheets for staff.
- Recover lost sales, save time, and get paid quicker for money use.
Read Also : How to Create Timesheets and Time Data Report in QuickBooks
How Many Reports Available in Time Tracking in QuickBooks
There are 4 time tracking reports available in QuickBooks Desktop:
💠 Time activities by Employee Detail
💠 Recent/Edited time activities
💠 Unbilled time
💠 Time activities by customer detail
Total Time: 35 minutes
Steps to Access Time Tracking Reports in QuickBooks
🔸 In the beginning, navigate to the Reports
🔸 Insert any of the following: customer details time activities, recent/edited time activities, unbold time, and employee time activities in the field of the Report name.
Step by Step Instructions to Setup Time Tracking in QuickBooks
Perform the steps mentioned below in order to set up the time-tracking feature in QuickBooks:
Initially, sign in as Admin
🔸 Make sure you’re in a single-user mode
🔸 Next, move to the Edit option and then click Preferences
🔸 Within the Preferences window, click on the Time & Expenses option
🔸 Now, go to the Company Preferences
🔸 Afterward, hit “Yes” for Do You Track Time
🔸 In the First Day of Work Week drop-down list, select the day on which you begin monitoring time every week. Both weekly timesheets influence the day you pick.
🔸 At last, click OK.
Steps to Create Timesheets in QuickBooks
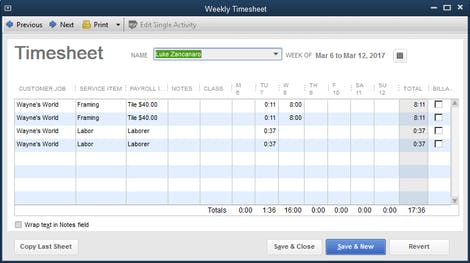
In QuickBooks, you can use timesheets to enter your employees’ details and the hours worked to build employee payrolls.
🔸 Click
🔸 Enter Time
🔸 In order to track hours worked or enter a particular task, enter a weekly timesheet.
Steps to Enter a Weekly Timesheet of Employee in QuickBooks
In order to monitor daily work hours, you can create a weekly timesheet. Follow the steps provided below:
🔸 The very first, choose the employee name
🔸 Next, select the customer: If the hours worked are checkable, pick a client: Job and Service object
🔸 To pick a Billable Click column
🔸 For the time worked, pick the payroll item
🔸 Depending on your preferences, add a WC code and a class
🔸 In the column, press the day on which the time was spent
🔸 For the payroll component, enter the hours worked
🔸 Repeat until the week is done with each hour worked
🔸 Press the option Close & Save.
Steps to Create a Time Data Report in QuickBooks
Use the Customize Report feature to create a Time by Name report that shows employee names, customer names associated with the timesheet, the total number of hours worked in the date range that you pick, and shows details.
Follow the steps to create a time data report:
🔸 Click Reports and then move to Jobs
🔸 Next, select Time and Mileage
🔸 Now, click on the Time by Name
🔸 After that, select Customize Report
🔸 In the View window, either press Filters, or press the names or things that you want to include in the report to view more columns for your report.
🔸 If there are several names or objects you want to display:
🔹 Click the arrow at the bottom for the selected names
🔹 Choose multiples
🔹 Click the button to select things from the list given
🔸 To make your choices work, click OK
🔸 Click OK to save your modifications.
Steps for Setting up Employees for Time Tracking in QuickBooks
Follow the below-mentioned steps to set up employees for time tracking in QuickBooks:
🔸 To start with, you have to click the Employee Center
🔸 Next, select the employee’s name by double-clicking on the same
🔸 Now, move to the Payroll Info tab
🔸 Select and click Use Time Data when creating Paychecks.
How to Change the Day of the Week in the Timesheet in QuickBooks
Steps to adjust the day of the week that the timesheet starts-
🔸 Go to the Edit and then select Preferences
🔸 Next, select the Time & Expenses or Time Tracking
🔸 Now, move to the Company Preferences
🔸 Using the drop-down menu, select the day your work week starts
🔸 Lastly, hit Ok.
How to Use Timesheets in QuickBooks Desktop
Winding-up!
With the above-provided information, you can configure all the features as per your requirements. If you still need any further assistance regarding how to use time tracking in QuickBooks Desktop, then feel free to get in touch with QuickBooks technical support Toll-free helpdesk number . Alternatively, you can drop an email at this email address support@apropayroll.com or can use pops up that appears on the official website apropayroll.com for live chat with experts.

