In today’s blog post, we’ll walk you through how to issue a customer refund in Quickbooks, based on numerous conditions.
Customers frequently request money refunds when they are dissatisfied with the goods or services they purchased from you. You must send out a credit memo whenever a customer returns something to you. To satisfy the consumer and foster understanding, you must instead offer a refund receipt in cases when money is refunded because the client received the incorrect or a damaged goods and is not prepared to order that product again. It frequently occurs, but you shouldn’t be concerned since in this blog post we’ll go over the procedures for how to issue customer refund in QuickBooks based on numerous conditions. You must make sure that your books are up-to-date. Moreover, we’ve included different methods for recording customer refunds in QuickBooks.
What is a Refund in QuickBooks?
A refund is a reversal of a customer’s obligation to pay for goods and services.
In QuickBooks, you can issue refunds to customers by following these steps:
- Open the Customers tab and select the customer you want to refund.
- On the Refund tab, under Refund Type, choose One Time Refund.
- In the Amount box, type the amount of money you want to refund to the customer.
- In the Date box, type the date you want the refund to take effect.
- Click Refund.
- The customer’s account will update with the new refund amount and date.
See Also:
Import American Express Transactions into QuickBooks
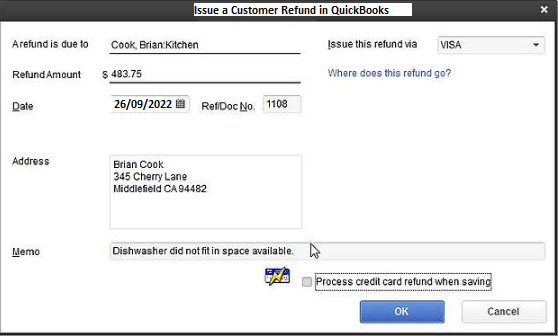
How to Issue a Customer Refund in QuickBooks?
❖ Select Create Credit Memos/Refunds from the Customers option at the top of the page
❖ Fill out all required forms after selecting the customer from the menu
❖ Choose the item and quantity for which the buyer will receive a refund
❖ Choose between Save & New or Save & Close (A new window will appear with the messages displayed on your screen)
❖ Select Apply to an Invoice, then select the checkbox to the left of the Invoice that you are issuing a refund for
❖ Hit on the “Done” button.
NOTE: By accessing the invoice and choosing Apply Credits, you may always go back and add a credit or refund to it.
Apply the full payment to the invoice and select Leave the remainder as a credit when prompted if a customer overpaid and needs you to maintain the credit on file. Choose Give a refund, choose the account from which to repay the money, and click “Ok” if the customer requests that the refund be paid over.
Different Methods to Record Customer Refunds in QuickBooks
Let’s know the steps to get a refund for products or services that don’t satisfy the customer:
As previously stated, you should simply issue a refund receipt for an item or service if you request refunds rather than decreasing an outstanding or future balance. In the event that a client doesn’t return the item, a vendor refund check will be sent, which will reduce the customer’s income account and withdraw the refund amount from their bank account. You can reimburse them using their credit card or another form of payment if they use one of those methods to pay.
You must make sure that you haven’t entered a credit memo yet to prevent receiving a double refund. Do you know how to use QuickBooks Online to accept credit card payments? If not, check it out right away.
It’s very similar to filling out the invoice window to complete the refund receipt window.
Follow the instructions below to see the refund receipt window:
❖ Start by selecting the +New option
❖ Next, select Either Give Refund or Refund Receipt
❖ Select the bank where you want the refund by clicking on the Customer dropdown menu
❖ Select the bank where you deposited the invoice money from the “Refund From” menu
❖ If the consumer doesn’t return any goods to you, you must select the Return & Allowances service. If a customer is prepared to return an item they have already received, you must list all of the goods or services they have returned in the Product or Service column (now there is no need to choose Return & Allowances service).
What Should you Do If a Customer Doesn’t Return an Item?
❖ You must create an account called Return and Allowances when your consumer fails to return an item.
❖ Just give this account a category type of Income and a detail kind of Discount/Refunds offered to get started
❖ Following that, you must create a service on the Product and Service list
❖ Provide a name for the product and service now, such as customer refunds or Return & Allowances
Note: Keep in mind that you shouldn’t select Is Taxable for this service
❖ Now that service has been assigned to the Return & Allowances account, make sure you haven’t indicated any prices or rates there
❖ Make sure the rate, quantity, amount, tax, and other fields are filled in correctly
❖ To save your changes, choose Save & Close at the end.
Note: You can scroll down to the bottom of the refund receipt transaction window and enter the same information that appears at the bottom of an invoice.
Steps to Refund a Customer’s Overpayment or Credit
If it includes the essential fields stated below, you are qualified to use Check or Expense to record a refund to your customer:
❖ If the client wants to use their unused credits
❖ If a customer prepays for an order and cancels it before the products or services arrive at their location
❖ If a client asks you to reimburse an unintentional overcharge.
The customer’s open credit, overpayment, and prepayment are negated when refunds are recorded as a check or expense, which lowers your bank balance.
Total Time: 10 minutes
Step 1: Record the Refund for Your Customer
❖ To begin, select the +New option
❖ Select Expense, Add Expense, or Check
❖ Simply follow the instructions to transition from business perspective to accountant first view if you are in business view, and then move back to complete these steps
❖ From the Payee drop-down menu, select the client you want to repay
❖ From the Payment account drop-down menu, select the bank account where you deposited the excess funds
❖ On the first line of the Category column, pick an Account Receivable
❖ You need to enter the amount of the refund in the Amount area
❖ Complete the remaining fields as you see fit
❖ To keep the changes, select the Save and Close option at the end.
Visit Details: How to Import Credit Card Transactions into QuickBooks
Step 2: Link the Refund to the Customer’s Credit or Overpayment
❖ Start by selecting the +New option
❖ Next, select either Receive payment or Receive invoice payment
❖ Now, select the same client for checks and expenses
❖ After that, fill up the remaining fields as you see fit
❖ You must select the checkbox next to the expense or check you made in the section titled “Outstanding Transactions”
❖ Verify that the payment is equal to the outstanding balance
❖ To preserve your changes, simply select the Save and Close option at the end.
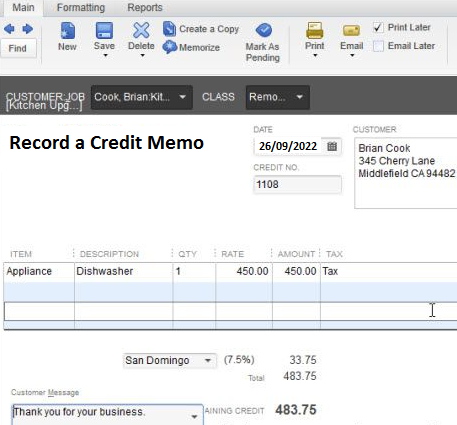
How to Record a Credit Memo?
When consumers return already-purchased items, you must create a credit memo in QuickBooks Online if you and the customer agree that the customer’s outstanding and future debt will be decreased.
Note: By default, credit memos apply to both current and upcoming invoices.
You must take the following basic steps if you want to change how it behaves:
❖ Simply launch the Accounts and Settings dialogue box (Gear Menu >>> Account and Settings) Next, click on the Advanced tab on the left before moving to the Automation section on the right
❖ Finally, select the Automatically Apply Credits radio button (now you have successfully changed its behaviour)
To display the Credit Memo window, input the Credit Memo transaction in a manner similar to how you would enter the invoice window.
Follow the instructions below to open the Credit Memo Window:
❖ Start by clicking the Create Menu button
❖ After that, choose Credit Memo or Sales Transaction from the New Transaction screen
❖ Then click the Credit Memo button
❖ Select the customer for whom you are requesting a credit memo inside the product/Services
❖ The Credit Memo window’s bottom section must be filled out with relevant information
❖ Finally, the transaction is now saved (as same as the invoice transaction window).
Note: Even if a client doesn’t currently owe any invoices, you are still permitted to write a credit memo for that customer. However, keep in mind that whenever you enter the subsequent invoice for that customer, QuickBooks Online will immediately apply the credit memo to that invoice. In contrast, when you enter a credit memo for a customer who has unpaid invoices, QuickBooks Online automatically applies the credit memo to the unpaid invoice. If you inspect the sales transaction list for the specific invoice, you must observe that the Status is Partial (specifying that the invoice is partially paid).
For Free Consultation With QuickBooks Experts: Just Call or Chat With Us
Conclusion
Well, we have covered all the major information that are frequently asked by QuickBooks users related to issue customer refund in QuickBooks. In case, you stuck or having issues then don’t worry, our QuickBooks ProAdvisors are available 24*7 to assist you in every steps also analyse your company and provide the appropriate software that enables you to accomplish your business objectives.
Frequently Asked Questions
How Can a Consumer be Given a Refund if the Invoice Has Already Been Paid?
The process listed below can be used if you need to refund a customer’s money. If the invoice has already been paid, as discussed here.
❖ Select Credit memo from the +New menu
❖ Select the correct customer in the Customer column
❖ Type in the Credit Memo Date, Amount, Tax, and Product/Service
❖ At last, click on the Save and Exit button.
What is the Steps Involved in Issuing Customer Refund in QuickBooks Mac?
Choose Create Credit Memos/Refunds under Customers in the top menu bar. Choose the customer from the drop-down, then fill out all the necessary data. Choose the item and quantity for which you are refunding the customer. At the bottom right, select Save. Choose the bank account you’ll be using for the return in the check window, enter the amount, and then click Save in the lower right corner.
How Can You Cancel an Invoice and Refund a Deposit?
You can reverse the deposit by refunding the customer’s money and applying a credit if they paid you a deposit but afterwards requested a refund. If you use QuickBooks Online, follow these steps to fix the problem.
❖ Initially, generate a credit memo
❖ Next, make a check to return the deposit
❖ At last, record a payment.