It goes beyond doubt that QuickBooks is one of the most sought after accounting software amongst the small and medium businesses. It has been quite useful for businesses in handling their day-to-day accounting and bookkeeping tasks more efficiently. QuickBooks is also known for its smooth functioning and user-friendly interface. However, its smooth working and efficiency may get hampered if the software is damaged or full of errors. In such a case, removing the existing QuickBooks and re-installing QuickBooks is one of the feasible solutions suggested by experts.
But, how you remove the existing QB application is also important in this context. If the removal is not proper and you have not been able to remove the residual files and folders , the same errors may reoccur. But you don’t need to worry. In this blog, we will show you how to remove QuickBooks completely with a removal tool named Clean Install QuickBooks Desktop.
First things first! Let’s get to know when you should use the QuickBooks removal tool..
When to Use the QuickBooks Removal Tool
you should use the QuickBooks removal tool when you encounter one or more of the below-mentioned situations-
- A QB error message is popping up when you try to open more than one company file.
- You are getting a QuickBooks installation error.
- When you are not able to fix common QuickBooks error codes even after a simple QuickBooks reinstall.
How to Use the QuickBooks Clean Install Tool?
Here, we will divide the entire procedure to a few steps as given below-
Total Time: 10 minutes
Step 1: Uninstall QuickBooks Desktop
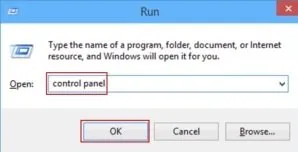
🔷 Press Windows+R on your keyboard
🔷 The Run command window will open up
🔷 Type in Control Panel in the Run text box
🔷 Click OK
🔷 The following screen will appear
🔷 Click on Programs and Features
🔷 Click on Uninstall a Program.
🔷 Search for QuickBooks from the list of installed programs and double-click on it
🔷 Click on the Uninstall/Change option
🔷 Now click on the Uninstall tab to start the uninstallation
🔷 Follow the on-screen instructions to remove the QuickBooks Desktop application
Step 2: Rename the QuickBooks Installation Folders
Here are the steps to follow-
🔷 Do ensure your Windows setting is changed to Display Hidden Files and Folders.
🔷 Press Windows + E and Open Windows File Manager
🔷 Browse to QuickBooks installation folder
🔷 Right-click the QuickBooks folder
🔷 Choose Rename
🔷 After the folder name, type OLD
Step 3: Run the QuickBooks Clean Install Tool
🔷 Download the ‘QuickBooks Tools Hub’.
🔷 Store the file on your computer.
🔷 Go to the downloads folder and open the QuickBooks Tools Hub
🔷 Follow the instructions on the screen to finish the installation process
🔷 Click on ‘I accept’ to accept the terms of the license agreement.
🔷 Now click on the QuickBooks Tools Hub icon on your desktop
🔷 Choose Installation Issues
🔷 Click on the tab named Clean Install Tool.
🔷 Choose your preferred QuickBooks desktop version
🔷 Click on Continue.
🔷 The “Please install your copy of QuickBooks to the default location” message will appear on your screen
🔷 Click OK to proceed
🔷 After the Tool completely removes the QuickBooks application, proceed with a new installation of QuickBooks.
Read Also-: How to Install the QuickBooks Tool Hub
Final Words :
We hope from the discussion above, you may been able to know all the important information about the QuickBooks removal tool. If you are having any more queries in this regard , we would recommend you to take help from the authorized QuickBooks experts. Use a live chat, email support@apropayroll.com, to reach the experts.
💠Frequently Asked Questions 💠
What are the Points to Keep in Mind before Running the QuickBooks Removal Tool?
Please ensure the following before you run the QuickBooks removal tool-
▪ Please take a proper backup of your QB company files. This will ensure that your crucial business data is not lost
▪ Keep the QB product or license number for ready reference. You will need them while reinstalling the QB application
Before Using the QuickBooks Removal Tool, How Can I take a Backup of the QB Company File?
Here is the process to take a backup of your QB company file-
▪ Double-click on the QuickBooks Desktop icon on your computer and open it.
▪ Go to the File menu
▪ Navigate to the Back Up Company option and create a local backup
▪ You can choose to either have a Online Backup or Local Backup .
▪ Click on Next
▪ Follow the on screen instructions to complete the process of backup.