Peachtree and QuickBooks, both are well-known accounting software which is most widely used but there could be some reason why you want to convert from Peachtree to QuickBooks. Converting files has never been so easy, and you’ve made the switch to QuickBooks but you have years of data that need to be converted and this could be one of the reasons.
Points to Keep in Mind while Converting Peachtree to QuickBooks
Peachtree is also known as Sage 50 so doesn’t confuse with the name Sage 50 and Peachtree. Sage 50 can be converted into QuickBooks into two ways either by any version or by using QuickBooks Conversion tools.
Here are Some of the Points to Keep in Mind before Converting Sage 50/Peachtree to QuickBooks:
- It is necessary to install both the software on the same computer system.
- You can use the QuickBooks Converting tool to convert Sage 50 to QuickBooks 2016 or later.
Steps to Convert from Sage 50 to QuickBooks Desktop
Total Time: 34 minutes
Step 1: Reviews the Conversion Requirements
💠 Operating system:
Windows 10, Windows 8.1, Windows 8
💠 Processor:
500 MHz Intel Pentium II (minimum)
💠 Memory (RAM):
512 MB (minimum)
💠 Hard Drive:
2.5 GB of free space (recommended)
💠 Microsoft.NET Framework:
Version 2.0 (minimum)
💠 QuickBooks Desktop:
Pro, Premier, or Enterprise 2016 or higher
💠 Sage 50:
Version 2013 and above
Step 2: Prepare for the Conversion.
💠 If you haven’t already, you have to install QuickBooks Desktop on the same computer as Sage 50.
💠 Verify that your Sage 50 and QuickBooks Desktop data is stored on your local hard drive. If it isn’t, move it to your local hard drive before you start.
💠 It is very important to create a backup of your Sage 50 data before you start.
Step 3: Setup Sage 50
💠 Open file and Sage 50 you want to convert.
💠 From the main menu, select maintain.
💠 Select users and then set up
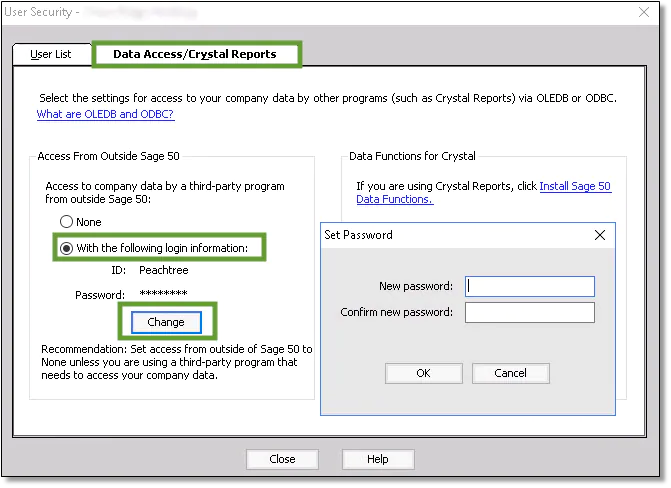
💠 Select data access/ crystal reports tab
💠 Select With the following login information option
💠 Go to Change and set a new password for the transfer.
💠 After you set a new password, close Sage 50.
Step 4: Download the Conversion Tools
💠 Download the QuickBooks conversion tool
💠 Find and open the folder you saved the downloaded file to.
💠 Right-click QuickBooksConversionToolSetup.exe and select Run as Administrator.
Step 5: Convert your Data
💠 To convert your data in the same conversion tool, select browse.
💠 In the same find and select Sage 50 Company file what you want to convert.
💠 In the pervasive 32-bit file ODBS engine DSN Setup window, select your QuickBooks company file from the
💠 Database Name drop-down menu. Then select OK.
💠 Enter the Sage 50 password you just created. Then select next.
💠 Select the QuickBooks Desktop version and edition where you want to move your Sage data.
💠 Go to Browse and pick the folder where your converted data will be stored. Then press next. If you do not
💠 Choose a folder, the My Documents tab is by default.
💠 Review what you have entered. Select Convert File to start the conversion if everything looks good.
💠 The conversion tool runs automatically. It may take some time to convert your data.
Step 6: Review the Conversion
Once the conversion of data finished. Open in QuickBooks and Review your data. Make sure everything is there. To review the transfer log steps involved:
💠 Open the Windows Start menu.
💠 Search for File Explorer and open it.
💠 Go to C:\USERS\[Your Windows User Name]\My Documents\Intuit\QuickBooks.
💠 Review the failed log file for the transaction in the folder. This tells you whether any data has been transferred or not.
After you review the log, everything is ready to go to QuickBooks desktop.
Sage 50 to QuickBooks Conversion | Convert Sage 50 to QuickBooks
Your assistance channel
For any further assistance or if you have any doubts related to converting Peachtree to QuickBooks or facing any other issue with your QuickBooks software, call us at our Sage 50 Support Phone Number.