
Entering credit card charges provides you with the most accurate and up-to-date financials in QuickBooks Online. While bank feeds make it possible for your credit cards to sync with QuickBooks Online and instantly show up in the register, there is a delay between the time of the actual credit card transaction and the time the transaction first appears as pending before it posts to your credit card statement.
Payments that are pending will not be sent via bank feed. Only real payments those that have been made with your credit card and shown up on your statement will be sent to your bank feeds. This article shows you how to enter credit card charges QuickBooks Online using different ways. So, stay tuned till the end of the article.
Things Must be Done Before Entering Credit Card Charges QuickBooks Online
The below are the following things that must be done before you move to the process for entering Credit Card Charges in QuickBooks Online:
➣ There aren’t many credit card expenses for your company.
➣ Through QuickBooks Online bank feeds, you cannot import charges.
➣ You should regularly watch your budgets and want the most current, accurate financial information available every day.
➣ Due to end-of-accounting-period reporting, you require up-to-date financials, yet QuickBooks Online bank feeds cannot import pending charges.
3 Methods How to Enter Credit Card Charges in QuickBooks Online?
The simplest way to add Credit Card Charges in QuickBooks Online is manually entering the transaction and then matching it to your bank feed whenever the bank feed transactions show up on your register. Some accountants and bookkeepers are accustomed to manually recording transactions from receipts and then tying the receipts to the credit card statement. Bank inputs hasten and improve the efficiency of the reconciliation procedure.
It takes little time or effort to enter credit card charges into QuickBooks Online using the below-discussed different methods. Let’s try one after one.
Total Time: 30 minutes
Method 1: Enter Transactions and Match Them to the Bank Feed
Due to the ease of matching and reconciling and its effectiveness, this method is most frequently utilised.
Complete the next procedure:
➣ On your screen, click on the “+New” in the top right corner
➣ Click “Expense” under the subcategory “Vendors”
➣ Complete the payee field on the expense page
➣ You can choose the payee’s name from the drop-down menu under Payee if their information is already stored in your QuickBooks Online
➣ Click “Add” to add the payee’s name to the dropdown list if they are not already in your QuickBooks Online system.
Then enter the subsequent data:
Name
Type: There are three options: vendor, customer, and employee. You can alter the type after choosing it and add information about the payee, like their address, phone number, business ID, and Social Security number.
➣ Choose the proper account from the Payment Account field
➣ A list that has been filled up will appear, as seen below
➣ Choose “+Add new” and enter the account details if the account is not already in the list.
Account Type: Choose “Credit Card”, “Bank”, or “Other Current Assets” for the account type
Detail Type: Using the options you chose above, complete the appropriate fields
Name: Give the account a name
Description: Fill out any extra information if desired
➣ Date of payment: Indicate the date that the payment will be made
➣ Payment method:
From the drop-down menu, choose “Cash,” “Check,” “Credit Card,” or a previously selected payment method from the programmed list. Select “+Add new” and enter your details if this option does not recognise your preferred payment method
➣ Tags: When it comes to tags as custom, it let you to access, track, and retrive transactions.
➣ What tax category fits: There is a drop-down menu of suggested categories in QuickBooks Online. Select “+Add new” if none of the tax categories apply to your transaction.
➣ Description: Give the transaction a brief description and click “Save”.
➣ Amount: Enter this amount, then click “Save”.
Alternate Ways: Upload Receipts
There is an alternative to Option 1 if you prefer to post and match receipts using your computer (or phone) rather than posting them manually. Take the following actions:
➣ Select the “Banking” tab from the landing page, followed by “Receipts”
➣ Next, choose the “Upload from PC” option on the Receipts page
➣ The software allows you to add images of receipts and upload them from your phone as well
To match the transaction from the Banking command, QuickBooks Online will ask you.
Click Know: How to Create. Edit, Delete QuickBooks Memorized Transaction
Method 2: Enter the Transactions From Bank Feed or Import
Not all business owners will submit their credit card costs using the first technique in QuickBooks Online. The majority actually decide to simply link their credit card account to QuickBooks Online and input credit card transactions via bank feed.
Here’s how:
➣ Set up a credit card connection for QuickBooks Online. If a direct bank feed is unavailable or if you need to enter transactions that happened too long ago to be included in the bank feed, you can also import your transactions.
➣ Use the Banking panel to categorise your transactions once they have been imported, whether automatically from your bank or from a manual import. You’ll see that your bank feed gives you the ability to add, view, or match transactions. You’ll utilise the Match feature more frequently if you enter your credit card transactions using the first way. To be sure you are matching the correct transaction, you must take care.
Match
To expand the transaction, click into it. Except for the “Match” link and the checkbox to the left of the transaction, you can click anywhere in this line to enlarge the transaction.
Examine the transaction in detail. Make sure everything makes sense before proceeding. Does the Payee name match the Bank Detail line? Is this date correct? If you’re unsure, you can review the transaction in greater detail by clicking the link, in this case, “CC Expense.” To see additional transactions that might be connected to this one, click the “Find other records” option.
Click the Match button as soon as you are certain about the match.
The fact that you are not adding a transaction here must be noted. Simply put, you are reconciling a transaction by comparing one that you have already entered to the one in the bank feed.
View
If more than one previously entered transaction that could be connected to the transaction in the bank feed is found by QuickBooks Online, the View feature is displayed. To view the transactions, expand the details by clicking the “View” link.
Select the appropriate transaction by clicking the radio option in the enlarged window, then click Match.
Add
You can add transactions right away from the bank feed if you haven’t already entered data for credit card transactions in QuickBooks Online.
To expand the transaction, click on it as it appears under the Match section. In comparison to Match and View, this expanded view has additional fields and options. In actuality, this is just a condensed version of the Expense screen from the first way as discussed to enter credit card charges.
(a) Name of the vendor
(b) Expense category
(c) And memo, if desired, should all be included.
If this expense can be billed to a customer,
(d) Check the Billable box
(e) And enter the client’s name
(f) The “Create rule from this transaction” link will open the rules screen if there is a recurring transaction, such as a rent payment
(g) A document attachment can be added to the transaction
(h) You will frequently need to divide a transaction among several expense
Categories, and you may accomplish that by clicking on the Split option here
(i) When finished, use the Add button to include the transaction in QuickBooks Online.
Method 3: Enter Credit Card Charges Directly Into the Credit Card Register
You can enter credit card charges directly into the credit card register if you don’t want to use the bank feed/import technique or the expenditure entry method.
When would you apply this technique? Say you just sometimes used a credit card. Since the account was closed, you are unable to import transactions from an Excel or CSV file or connect to the bank stream, even though there aren’t many transactions.
Here’s how to easily enter your transactions into the credit card register:
➣ Configure the credit card. Hover your cursor over Accounting on the Dashboard, then select Chart of Accounts.
➣ On the following screen, click the New button.
➣ Now a pop-up window will appear
(a) Account Type should be set to credit card.
(b) The Detail Type will immediately update to “Credit Card”,
(c) The name field will also do the same
(d) Change the credit card’s name to the account name and the card’s last four digits. A description is not required unless you want to include a card-related note.
(e) Additionally, you won’t normally use the Sub-Account feature with a credit card
(f) The opening balances field is the last one on this screen. Select the card’s earliest usage date using the drop-down menu.
Your account’s balance as of the selected date must now be entered. Set this field to $0 if you are adding a new card. Before moving forward, speak with your accountant to make sure your balance sheet is still accurate if the card was in use before the date you started using it for business. To save and close your changes after entering your starting balance, click Save & Close button.
➣ You will then be taken back to your Chart of Accounts screen once the pop-up window closes. Click View Register after finding the newly formed account in the Chart of Accounts list
➣ The credit card register screen for the newly generated credit card will now be displayed to you. To add another line of data entry, click the “Add CC Expense” link
➣ Make sure the date field is accurate when filling out each field. The “Ref No.” and “Memo” fields are the only ones that are optional; all other fields must be filled out. Click the Save button when finished
➣ Don’t stop until you’ve input all of your credit card transactions. If you find that you entered some information incorrectly, simply go back to that line and click Edit to fix it. A transaction can also be removed if it was entered incorrectly
➣ If a credit card payment needs to be made, select “CC Credit” by selecting the down arrow next to the “Add CC expenditure” option. It’s critical to use the right transaction type at all times: CC Expense is for using your card to make purchases, whereas CC Credit is for using it to pay down the balance on your card.
Note: When entering a credit card payment, be sure to fill out the Account form with the bank account that the payment was made from.
To reconcile your account after entering all of your credit card charges and payments, click the Reconcile button. This makes it easier to verify that there was no data entering error.
Conclusion
This article covered all the key details and steps to enter credit card charges QuickBooks Online. You can easily get in touch with the team of specialists using QuickBooks Helpdesk Team to receive better assistance with less delay if you want to learn more about accounting software and the best solutions for QuickBooks issues or any other technical glitches. The team will be devotedly committed to answering your questions with the availability of 24/7.
A Frequently Asked Questions
What is the Difference Between Credit Card Transactions and Debit Card Transactions in QuickBooks Online?
There are two significant differences:
➣ Assets are diminished by credit transactions, unlike liabilities. The $1,200 credit is now decreasing your assets (your checking account) rather than increasing your liabilities.
➣ Instead of publishing to a different debit card account, this transaction is posting straight to your checking account. Keep in mind that your debit card functions similarly to a check in that it is merely a means of payment and not an entirely separate payment account.
How to Enter Credit Card Charges Into QuickBooks Pro?
You will manually enter credit card transactions differently if you use QuickBooks Pro’s desktop version. Although QuickBooks Pro doesn’t appear exactly like QuickBooks Online, the operation is relatively similar. Verify that your credit card is listed in your chart of accounts before manually entering your credit card charges in your QuickBooks Pro Edition.
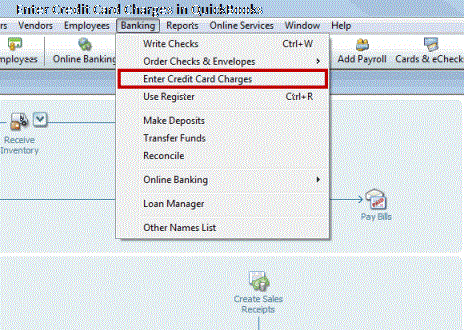
Here’s how you can enter credit card charges into QuickBooks Pro:
➣ Select “Banking” then “Credit Card Charges”
➣ Make sure “Purchase/Charge” has been selected before moving on to.
Step 2 (QuickBooks Pro should populate this for you)
Then, complete the following:
Purchased from: Choose the merchant from the drop-down menu
Date: Make your selection using the calendar
Ref no: Add a reference number if desired to assist organise and retrieve your transaction by coding it
Amount: Enter the transaction’s amount in this field
Memo: Use this text box to describe the purchase
Additional Information: You can add further details about the transaction here, though QuickBooks Pro will automatically record the expense account and transaction amount for you. Additional information is required if you only made one transaction overall but the transaction contained items from many categories.
Account: Click “Save” after making your selection from the dropdown menu to help code your spending.
When to Enter Credit Card Transactions in QuickBooks Online?
If you can’t import your credit card transactions but still need the most recent financial data, enter credit card charges in QuickBooks Online. Until the charges are final, which could take several days, credit card transactions won’t move from your account to QuickBooks. Prior to producing financial statements at the end of the month, quarter, or year, it’s critical to have up-to-date financial data.