In QuickBooks Online, Vendor Credit is used to record returns to vendors. It is also used to supply the details of vendor refunds. Though, it’s recorded therefore no confusion when it comes to paying the seller. Customers can keep up-to-date information on their financial situation by recording refunds in various instances. To make your task much simpler and quicker, it is necessary to understand how to record a Refund from a vendor in QuickBooks Online. The steps for recording a vendor refund in QuickBooks might vary in different situations. So, read this article very carefully till the end to get aware of all the cases when it comes to recording a refund from a vendor in QuickBooks.
Different Scenarios to Record a Refund from a Vendor in QuickBooks Online?
The vendor can issue a credit document stating that you no more owe the amount or they can also issue a refund check. Below are discussed cases that you should know before recording a refund from a vendor in QuickBooks Online:
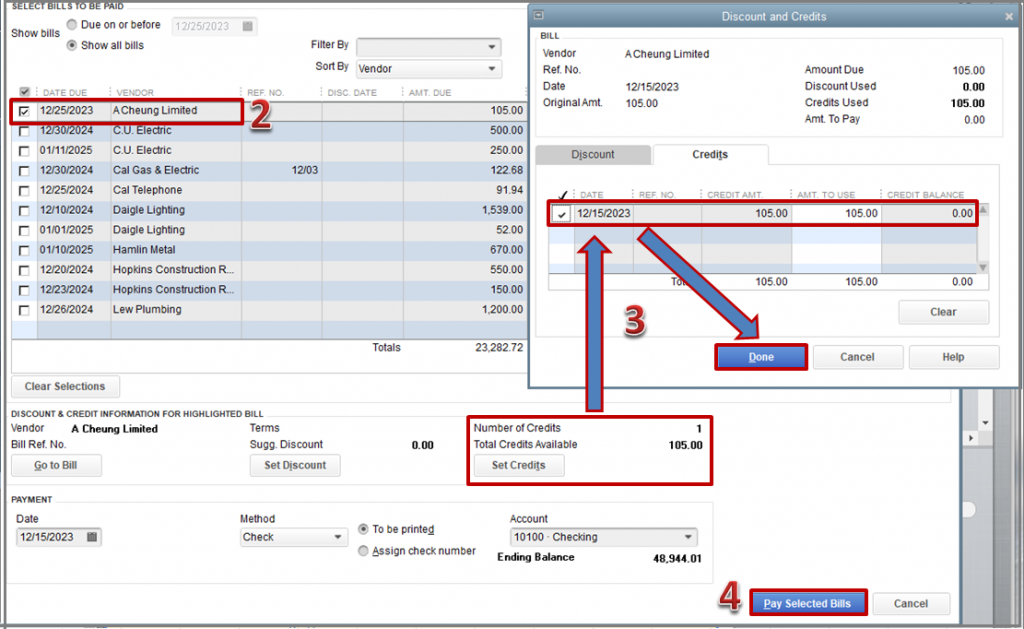
Case 1: You must record the credit document on the vendor credit and apply it when you pay the vendor’s bill.
Case 2: When a vendor issues a refund check, you must still record it to the vendor credit, as well as enter the deposit for the vendor check and then try to link it to the vendor credit.

Let’s See the Detailed Steps to Execute Both as below:
Step 1: Enter the Vendor Credit:
- First, click on the + New tab
- Next, go to the Vendors list and select the option “Vendor Credit”
- Now, browse the vendor from the drop-down menu “Choose the vendors”
- Enter correct issue date of the credit document or refund check
- After that, enter the credit amount at the top-right corner
- Choose the account that you want to use for original billing in the account details
- Choose the items within the item details which you returned to the vendor
- Along with that, attach an electronic copy of the credit
- At last, save and close from the bottom right in your screen.
If you receive a check that indicates you have to record the refund check from a vendor in QuickBooks Online.
Step 2: Deposit Refund Check of Vendor:
In this particular step, you have to record the refund check after it is done with recording it into vendor credit and you also require a deposit check in QuickBooks Online.
- The very first, click on the + New tab
- Select the option “Bank Deposit” from the “Others” column
- Fill out the required fields within the “Add new deposit” section
- Next, you have to enter the vendor name within “Received from”
- Choose the account payable in the “Account” section
- Now, enter the correct amount of refund within “Amount” field
- Click on the “Save and Close” tab using the downward arrow on the side of “Save and new”.
Step 3: Link Vendor Credit and Bank Deposit:
Using expenses, link the vendor credit and bank deposit to keep your vendor expenses accurate and up-to-date.
- Click on the + New menu
- Go to the Vendors column and then select the option “Expenses”
- Choose the vendor that issues credit document/refund check
- Add the current transaction on the right-hand of the screen in both Vendor Credit as well as bank deposit
- Once you add then you can observe that the net balance of the payment bill becomes zero
- In the end, hit “Save & Close”.
This is the complete process to record a Refund from a Vendor in QuickBooks Online in a simple and efficient way.
Record a Credit Card Refund in QuickBooks Online:
This approach will be utilized when you use your company credit card to make a purchase and then have to return the item for some reason. After that, the vendor will normally reimburse the amount charged to your credit card.
- Initially, go to the Gear icon and then click “Chart of Accounts”
- From the list, choose the credit card and then hit “View register”
- Now, using the drop-down menu, select the “CC Credit” within the “Add CC expense” section
- A new window will appear with a name”Credit Card Register”
- In this, you need to fill some of the required details
- Verify once whether you choose the correct credit card or not in “Account” section
- Once done with that then enter the date when you returned the product
- Choose the vendor to whom you want to return the product in the “Payee account”
- You can also add the relevant description in the Memo
- Enter the price of the returned product within the “payment” section
- After correctly entering the required fields, you have to click on the “Save” button.
Related article: How to Fix QuickBooks Point of Sale Unable to Read a Credit Cards
Steps Required to Follow to Record a Vendor Refund in QuickBooks:
If your vendor issues a refund check, you may quickly link it to the vendor credit by adding a deposit for the refund check. Follow these steps to accomplish this:
- In the beginning, click on the Create + sign and then click “Bank Deposits”
- Find the “Add New Deposits” menu and then enter the following details
- From a row, click on the vendor who issues the check-in the Received
- Hit the “Accounts Payable account”
- And then add the correct amount of the check
- Select the arrow which is just beside the “Save and New” tab
- Next, click on the “Save & Late” >>> “Close”
- Again, go to the Create + New symbol and then click on the “Expense”
- Choose the vendor whose refund check that you have deposited
- Consequently, choose the “Add” within the section called “Outstanding Vendor Credit”
- After that, go to the Add in the Deposit
Finally, move to the arrow beside the “Save and New” and then hit the “Save and Close” tab.
Also Read: How to Download Bank Transactions into QuickBooks Desktop
Conclusion:
Above we covered all the methods to record a refund from a vendor in QuickBooks Online as well as in QuickBooks Desktop. You can perform any of them as per your requirements.
If anything related to QuickBooks software is still bothering you and you are seeking for an expert who can drag you out from this situation. Then our certified QuickBooks team will help you and instantly solve your error/doubt. We provide 24/7 service so don’t hesitate to call us anytime or chat with us 24×7.
Frequently Asked Questions
Q1. How do you record a Vendor Credit in QuickBooks Online?
Ans: ➤ Click on the “Create + New sign and then select the “Vendor Credit” option
➤ Choose the vendor who issued the credit
➤ Enter the correct date of the credit
➤ After that, enter the accurate credit amount
➤ Go to the Account Details section and choose the account which was used at the time of the original bill.
Q2. How do I categorize the refund in QuickBooks?
Ans: You can easily categorize the refund from the downloaded transaction list. Here are the steps to do so:
➤ Initially, visit the “Banking” page
➤ Next, go to the Banking menu and select the tab called “For Review”
➤ Now, select the downloaded transaction and choose “Category refund”
➤ Lastly, click “Add”.
Q3. What is the procedure for recording insurance refunds in QuickBooks?
Ans: ➤ Go to the Banking menu and from the list, select “Enter Credit Card Charges”
➤ Choose the correct credit card account
➤ Next, select the insurance company in the “Purchased Form” field
➤ Click on the “refund/Credit” radio button
➤ Enter all the required information in the form
➤ You must fill out the required field of expense account, date, and amount
➤ In the end, click “Save & Close”.

