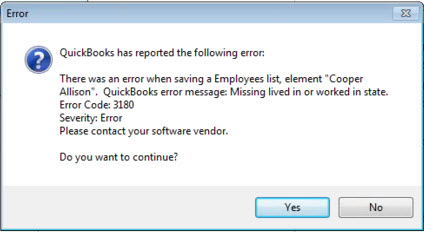
In QuickBooks, you can get multiple tools with the advanced and latest features to manage your business in a streamlined manner. In the below article we are going to discuss the QuickBooks Error 3180, its causes, and resolutions to get rid. While sending an employee record to the QuickBooks, or copying the company file, or updating the QuickBooks there can be a chance of coming to some errors and QuickBooks error 3180 is one of them. Anyone can easily resolve the error while following the below steps by step procedures. Let’s start the article.

What is QuickBooks Error 3180?
QuickBooks Error 3180 is an error that can be happened due to various reasons. It can come when QuickBooks Desktop sales tax item is not associated with any vendor. It can be also happened due to account mapping of sales tax payable accounts is incorrect. One another cause is the use of a sales tax payable account to create a paid out. With this error, you can see the message comes on the screen as “QuickBooks error code 3180” and which might be an interface to other programs on the screen.
What are the Reasons for QuickBooks Error 3180?
QuickBooks Error 3180 can be due to various reasons and some of the main causes are mentioned below:
- It can happen when QuickBooks desktop sales tax item is not related to any vendor
- If the accounting mapping of sales tax payable account is not correct.
- Use of sales tax payable account to create a paid out
- Due to one or more receipt or item on having the sales tax account select as destinations account
Solutions to Fix QuickBooks Error 3180
Total Time: 25 minutes
Merging Item in QuickBooks
🔷 First, open the QuickBooks desktop
🔷 Go to List option
🔷 Go to Item
🔷 Select to include the inactive
🔷 Now select the type header to sort the list
🔷 Rename the Point of sales payment items
🔷 Now do right-click the payment items which starts with POS
🔷 Select edit items
🔷 Add old to the name of the item
🔷 Select ok
🔷 Now run the financial exchange from your Point of sale
🔷 In QuickBooks Desktop now merge the duplicate items
🔷 Now do the right-click the payment method with the OLD
🔷 Select edit item
🔷 remove OLD
🔷 select ok
🔷 Now click yes to confirm
Make Sure That you Have Assigned the Vendor to Sales Tax Item
🔷 First, open QuickBooks Desktop
🔷 Go to list
🔷 Go to the item
🔷 Select include inactive
🔷 Select the type column to sort the list alphabetically
🔷 Now make sure all sales tax item should have tax agency associated with it
Select the Tax Preference
🔷 Open the QuickBooks POS
🔷 Go to the File option
🔷 Select Preferences
🔷 Now select company
🔷 Click on accounts under financial
🔷 Now click on basic and advanced tabs
🔷 Make sure to QuickBooks sales tax payable listed in the only sale tax row. It does not change it and run financial exchange
Make Sure That you Have not Paid Out the Problem Receipt using Sales Tax Payable
🔷 Open the QuickBooks POS
🔷 Select sales history
🔷 Right-click any of the column
🔷 Select customized columns
🔷 Select the QuickBooks status
🔷 Check the receipts which are not competed till now
🔷 Need to select the receipts if anyone is paid to sales tax payable
🔷 Click reverse receipt
🔷 Again create the paid out using a non sales tax payable account
🔷 Now at last run financial exchange
Winding-up
For any assistance feel free to visit accountingguide.co and do a live chat with the QuickBooks experts. QuickBooks team is having professional, polite trained and certified experts who are having massive experience in the same domain, and thus experience helps them to enhance the problem-solving skills. QuickBooks team can sort out your all issues related to QuickBooks and can provide the best QuickBooks chat support assistance throughout. accountingguide.co is a one-stop shop for all your needs. You can also email at support@apropayroll.com or fill the customer contact form to get a call from the QuickBooks experts.
