The QuickBooks error 323 is belongs to the banking error from the QuickBooks account. This error encounters where there are 2 similar accounts, the bank website won’t take your credentials for login, or the account is added mistakenly with the same name and account number. To resolve this error there are different solutions that can be opted by you to resolve the error. So read the full article for all the solutions and then choose anyone according to the cause. If you have any questions then fill the Query form and get connected with the team within 4 hours.
About QuickBooks Error 323
It is the banking error that appears when you connect two accounts in your QuickBooks account and they are similar. When a user tries to login with credentials but the website of that financial institution won’t accept it. There are many more reasons that you get to know in the article below. The solution is also mentioned here so that you can fix it on your own.
Factors Responsible for QuickBooks Error 323
The reasons for this QuickBooks error code 323 are as follows so that you can easily identify your reason for the cause:-
- When you add the same account twice mistakenly in your QuickBooks account
- In the product section, the same account is added 2 times
- If you have 2 accounts with the same name and account number
- When the credentials are not accepted by the bank for your account.
Methods to Resolve the QuickBooks Error Code 323
Below are the few methods that help you in resolving the error code. But first, identify the error caused so that, you get to know which method implementation is done to fix it. The solutions are as follows:-
Total Time: 35 minutes
Delete One Account in QuickBooks
🔷 Open the QuickBooks
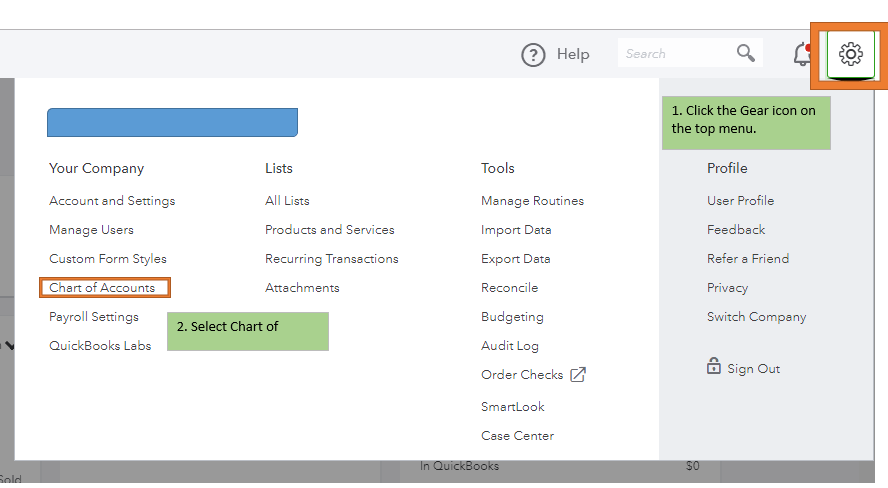
🔷 Then open the settings by clicking on the gear like option
🔷 Now from the Settings menu, click on the Chart of Accounts
🔷 After that also, select the account that you want to delete from the software
🔷 Click on the option Delete to delete the account
🔷 Then give the confirmation by clicking on the Confirm button
🔷 In the end, the duplicate account is deleted.
Download the Transaction in QuickBooks
🔷 Go to the settings in the QuickBooks
🔷 Then click on the option Set up a Transaction Download
🔷 Now you have to update the bank list
🔷 For that, click on My bank is not listed option
🔷 Then it updates the list in your system, after that all the updated details are visible to you
🔷 When it is done, click on the Show List option
🔷 Then select the Enter the name of your bank
🔷 Further, you have to enter the login ID and Password and click on the Continue
🔷 Now, you get the list of the accounts with their bank details
🔷 Link both accounts with a proper account
🔷 After it is done, you won’t get the error again.
Get the Bank Statement Downloaded in QuickBooks
🔷 Go to the List menu in the QuickBooks
🔷 Click on the Chart of Accounts from the drop-down options of Lists menu
🔷 Then select the Bank account that you are using for online banking
🔷 Now select the option Download Bank Statement
🔷 In QuickBooks, an Online Banking Center Window opens up
🔷 Then click on the View and then select the Add option
🔷 To finish it, choose the icon and then click on the Download
🔷 You get the bank statement downloaded.
Using the Bank Website, Rename the Account
🔷 First of all, click on the Banking option
🔷 Now from the list of accounts click on the account that you want to rename
🔷 Then click on the Edit option
🔷 Further, click on Edit account information
🔷 The account window opens up
🔷 In this, select the option Disconnect the account on save
🔷 Now click on the button Save to save all the settings you have done
🔷 Go to the settings and select the Chart of accounts option
🔷 Then select the account from the list that you disconnected above
🔷 In the end, click on the Delete button to get it done.
Export and then Import the Chart of Accounts
To Export in QuickBooks
🔷 In QuickBooks, click on the File menu option
🔷 From further options, click on the Utilities option
🔷 Then from more, select the Export option
🔷 In that, click on the List of IIF Files option
🔷 Then click on the option Chart of Accounts
🔷 Save the file that is required on your desktop
🔷 Now create a new file and it is done.
To Import in QuickBooks
🔷 For this, click on the Files menu
🔷 Then select the option Utilities
🔷 Further click on the Import from the drop-down menu
🔷 Select the IIF Files
🔷 Search for the Chart of Accounts IIF File that is saved on your desktop
🔷 Then open it in your QuickBooks account and the error is resolved.
Get 24/7 customer support at accountingguide.co
The conclusion is that all the solutions are mentioned above for how to fix QuickBooks error 323. You can easily get to know the reason and then implement the solution according to it.
The team is here 365 days a year to help you by providing the best assistance whenever you are in a problem. The team resolves all the issues and queries by answering it in less time. For any kind of glitches, fill the Query form and the team responds to you within 4 hours. You can also do the 24/7 live chat with QuickBooks professionals who are here to help you out.