
QuickBooks provides a highly user-friendly interface for businesses to accomplish their accounting and bookkeeping functions with utmost ease. However, very much like any other software, QuickBooks is also not without its fair share of issues. One common issue most users often face is the QuickBooks Screen Frozen – the program won’t close the issue. This issue mostly occurs when the user is entering a transaction or trying to close the software.
Are you being troubled by this issue too? Fret not! This blog will help you fix it. Here, we will discuss multiple solutions to unfreeze the QuickBooks screen quickly enough.
Here we go!
🔰 Why Does the QuickBooks Screen Frozen – Program Won’t Close the Issue Occur in the First Place?
Many technical reasons may lead to the occurrence of this issue. Some of these are listed below-
🔯 The updated version of the Windows operating system is not being used
🔯 Some important DDF files are damaged
🔯 Some of the applications running in the background may be consuming more system memory
🔯 Insecure files not allowing QuickBooks to access Windows
🔯 The UAC ( User Access Control ) is not enabled
🔰 Simple Methods to Fix the QuickBooks Screen Frozen – Program Won’t Close Issue
Easy Way 4 Method QuickBooks Screen Frozen – Program Won’t Close Issue
Total Time: 35 minutes
Method 1: Erase Cache and Temporary Internet Files
➤ Press Windows+R together on your keyboard. The Run Command window will open up on your screen
➤ Type Control in the text box
➤ Click OK to proceed
➤ Choose Network and Internet
➤ Click on the Internet Options tab
➤ Go to the General section
➤ Click on Delete
➤ Click on the tab named Temporary Internet files and website files
➤ Click on Delete again
➤ After you delete the internet temporary files, click on the Apply tab
➤ Click OK
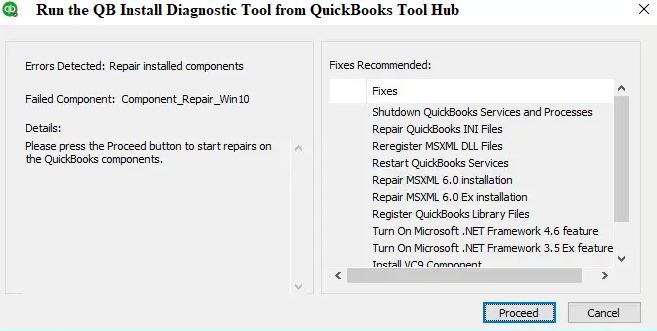
Method 2: Run the QuickBooks Install Diagnostic Tool From QuickBooks Tool Hub
➤ Download the QuickBooks Tool Hub installation file
➤ Browse to downloads
➤ Click on the file named QuickBooksToolsHub.exe
➤ Click Yes to allow this tool to make changes
➤ Click on Next to install it
➤ Click Yes in order to accept the license agreement terms & conditions
➤ Click on Next
➤ Click the Install button
➤ Wait until the installation gets completed
➤ Click Finish
➤ Click the QuickBooks Tool Hub icon on desktop
➤ Go to the Installation Issues section
➤ Click on QuickBooks Install Diagnostic Tool
➤ Wait till the configuration gets completed
➤ Click on Yes and accept the license terms & conditions
➤ Tab on Proceed to start repairing the QB desktop components.
➤ Once complete, restart the computer.
➤ Check if you are still getting the issue.
Method 3: Create & Restore the QuickBooks Portable Company File
➤ Click on QuickBooks File
➤ Now navigate to the File section
➤ Click on the Create Copy button
➤ Click on Portable Company File
➤ Click Next
➤ Choose the appropriate location to save your portable company file
➤ Click Save
➤ Click on OK to proceed
➤ Next, to restore the company file, go to File menu
➤ Click on the tab named Open or Restore Company
➤ Click Restore a portable file
➤ Click Next
➤ Browse to the location where you have saved the portable company file
➤ Click on Open
➤ Tab Next
➤ Now click on the restore the company file location tab
➤ Click Save
➤ Check if you are still getting the issue.
Method 4: Run the QuickBooks File Doctor
➤ Download the QuickBooks Tool Hub installation file
➤ Browse to downloads
➤ Click on the file named QuickBooksToolsHub.exe
➤ Click Yes to allow this tool to make changes
➤ Click on Next to install it
➤ Click Yes in order to accept the license agreement terms & conditions
➤ Click on Next
➤ Click the Install button
➤ Wait until the installation gets completed
➤ Click Finish
➤ Click the QuickBooks Tool Hub icon on desktop
➤ Go to the Company File Issues section
➤ Click the Run QuickBooks File Doctor tab
➤ Click Browse to select your company file
➤ Click the Check your file and network tab
➤ Press Continue
➤ Enter yourQB Admin password
➤ Click Next to start the scan. It may take some time, depending on the size of the company file
➤ Once complete, restart your computer.
➤ Check if you are still getting the issue.
We hope the discussion above would help you fix the QuickBooks Screen Frozen – Program Won’t Close Issue. If you are still not able to fix this issue, or, if you have any queries, you may speak to some of the experienced QuickBooks experts.
For Free Consultation With QuickBooks Experts: Just Call or Chat With Us
🔔 Frequently Asked Questions
♻ I am Asked to Rename the QBWUSER.INI File to Solve the QuickBooks Screen Frozen Issue on My computer. How to Do This?
⏩ Please Follow the Steps Below-
👉 Press Windows + E together to open the Windows File Manager
👉 Browse to the C:\ ProgramData\ Intuit\ QuickBooks folder.
👉 In the folder options, ensure that the box next to Show hidden files, folders and drives is marked
👉 Locate the QBWUSER.INI file.
👉 Do a right click on the file name
👉 Select Rename
👉 Add .OLD as the extension at the end of the file name.
👉 Save the new file name
👉 Launch QuickBooks Desktop.
👉 Check if the issue still persists
♻ I am Asked to Suppress and Update QuickBooks Desktop to Solve the QuickBooks Freezes Issue on my Computer. How to Do This?
⏩ Please Follow the Steps Below-
👉 Press and hold the Ctrl+Shift keys
👉 Double click on the QuickBooks desktop icon
👉 Do not release the Ctrl+Shift keys till QuickBooks is open.
👉 The No Company Open window will open up
👉 Then go to Help
👉 Click on Update QuickBooks Desktop
👉 Click on the Update Now tab on the top right corner
👉 Mark a check on Reset Update
👉 Click on Get Updates
👉 Once the update gets completed, close QuickBooks