In this article, the author goes over several steps you can take to Record Calculate Depreciation in QuickBooks. Many businesses need to calculate depreciation expense in their accounts, but create a lot of headaches when doing so. To calculate the depreciation expense for your business automatically, use the Calculate Depreciation in QuickBooks software.
Depreciation is an accounting technique that is used to give assets a real cost. The cost of the asset is allocated over the time it would be useful, whether it be physical or intangible. This approach specifies the extent of the asset’s value loss. This approach can differ slightly from accumulated depreciation. As the name implies, it details the accumulated depreciation of an item up until a specific point.
An account must be set up for the user in order to handle the accounting for QuickBooks depreciation. The Chart of Accounts tab is one that you’ll typically find in most QuickBooks versions. All processes involving accounts can benefit from using this tab. You can create your depreciation account using it as well. Once it is set up, you may move on to documenting the depreciation. You can calculate it once the recording or entering is finished. In this write-up, we’ll learn the detailed steps to Record Calculate Depreciation in QuickBooks.
Know Record Calculate Depreciation in QuickBooks
Depreciation is the process by which an asset’s value is diminished over time. For instance, throughout the course of its useful life, a work machine gradually loses all of its original purchase costs until it reaches $0. These are the methods the company uses in its books to determine the worth of those assets and present it.
What and All Information Do you Require Calculating Depreciation?
The details you need to know while calculating depreciation are as follows:
- Asset Useful Life: Depending on the asset type, this information can be found in tables. To find out the useful life of a particular item, you’ll also need an accountant.
- Minus the salvage value: At the end of the asset’s usable life, less the salvage values. Both the useful life and the salvage value are determined by a table.
- Divided by asset cost: This includes all expenses related to purchasing assets, including those related to configuration, training, and transportation.
What Type of Account is Depreciation in QuickBooks?
Fixed assets include the depreciation account in QuickBooks. Long-term investments are made in fixed assets. They may be used for as long as you need them. Due to use or other circumstances, an asset’s value may diminish over time. This category can be useful to measure its monetary value after it has been used. A contra account type can be used to describe accumulated depreciation. In order to lower the value of the associated account, a counter account is created in the general ledger. It reduces the cost of the balance sheet’s fixed asset items.
Steps to Set Up a Depreciation Account in QuickBooks
The QuickBooks program contains a list of accounts. The Chart of Accounts, sometimes also known as the COA, is this list. Depreciation can be set by using it in QuickBooks. COA can be utilised in the program for both a new account and a fixed asset account. The manual setup for QuickBooks Online can be done by using the same option.
Total Time: 15 minutes
Method 1: Setting Up in New Account
Users can modify QuickBooks Depreciation by clicking the Chart of Accounts option. After clicking on the Gear icon located on QuickBooks’ homepage, this option will appear. Next, you must select the New button. Selecting the Next option after choosing the Depreciation tab is necessary.
Here is how to depreciate using a COA in QuickBooks:
➢ Initially, start the QuickBooks program
➢ Next, go to the “Gear” button and it will display the options
➢ After that, choose “Chart of Accounts”
➢ Once done with that, select the “New” button
➢ Now, click on the “Depreciation” option
➢ Select “Next” from the menu
➢ There will be a dialogue box appear and you’re supposed to enter the name of the depreciation account
➢ In the end, click on the “Finish” button.
After you press the button, a new depreciation account will be set up in your QuickBooks software.
Method 2: Setting Up a Depreciation of Fixed Assets in QuickBooks
QuickBooks allows for the depreciation of fixed assets. You must open a fixed asset account before you may depreciate your assets. On the QuickBooks window, select the Gear option. next click the COA tab, which stands for Chart of Accounts. From here, select New and search for the pull-down for Account Type. Select the Other Expense item from this menu.
Complete the processes and comprehend the depreciation process for fixed assets in QuickBooks:-
➢ In the accounting program, click the “Gear” icon
➢ Next, select the “Chart of Accounts” option
➢ Click on the New button
➢ Select “Other Expense” under the “Account Type” tab from the drop-down menu
➢ Select the “Depreciation” from the drop-down menu for “Detail Type”
➢ After that, mention the account’s name
➢ At last, click on the “Save & Close” button.
Sometime, apply this procedure so that the software can configure the fixed assets. You can use the account to record QuickBooks depreciation once you’ve verified that the setup is complete.
Method 3: Manually Set Up a Depreciation in QuickBooks Online
You can manually set up an account for depreciation in QuickBooks Online for any preferences or customizations. You must first select the Chart of Accounts button under the software’s Settings menu. It is necessary to select the New option. Select the Other Expense tab from the Account Type drop-down menu that is now visible. You must choose the Depreciation feature from the list of possibilities in the Detail Type pull-down.
➢ In the beginning, start the QuickBooks Online software
➢ Select the “Settings” from the menu
➢ Alternately, you might click the button that looks like a gear
➢ Select the “Chart of Accounts” tab
➢ After that, press the “New” button
➢ Check out the “Account Type” drop-down menu
➢ Select the “The Other Expense” option
➢ Select “Depreciation” from the “Detail Type” drop-down menu
➢ After that, give the account a name, such as “Asset Depreciation”
➢ Finally, hit the “Save and Close” from the menu.
After pressing this button, the software’s asset setup will be finished shortly. You can adjust the process manually if necessary. You can then go ahead and enter, post, or track depreciation in QuickBooks Online.
Different Methods to Record Calculate Depreciation in QuickBooks
You may want to begin entering the details into the depreciation account once it has been set up in the QuickBooks program. You must click the Lists button to accomplish this. If you are using the QuickBooks Desktop software on a Mac, you must locate and select the Chart of Accounts function. In addition, QuickBooks Online Journal Entry option enables users to enter or record depreciation. Keep reading if you want to discover the numerous approaches of recording depreciation charge in QuickBooks or other similar features.
Method 1: Using the Lists in QuickBooks
The Lists tab must be used to record depreciation in QuickBooks. The software’s main window contains this option. Tap the Chart of Accounts menu after clicking it. Then, to enter depreciation in QuickBooks, double-click the sub-account that is used to track the accrued depreciation. The amount of depreciation must also be entered.
➢ In the beginning, log in to your QuickBooks account
➢ Navigate to the “Lists” menu
➢ Then select the “Chart of Accounts” option
➢ Click the sub-account that helps in monitoring the accumulated depreciation of the asset that needs to be depreciated twice
➢ Mention the cost of depreciation for initiating a transaction
➢ Click or press “Account” in this section
➢ Complete the expense account that is used to track depreciation
➢ In the end, hit the “Save” button to finish the process.
Method 2: Via Lists in QuickBooks Desktop for Mac
The Chart of Accounts option in QuickBooks Desktop for Mac allows users to profit from the advantages of recording depreciation in their programme. You must select the Lists button in order to access this tab. Once you’ve located the COA button, select it. Select the sub-account that you will use to track the cumulative depreciation after that. Hit Use Register in the Action drop-down after moving there.
The procedure that is to be carried out in order to get more information about recording depreciation in QuickBooks Desktop for Mac is as follows:
➢ To begin, open the QuickBooks Desktop for Mac window
➢ Next, select the “Lists” tab
➢ After that, go to the “Chart of Accounts” tab
➢ The sub-account that will be used to track the total depreciation must be decided
➢ Use Register can be selected using the drop-down menu from the “Action” tab
➢ The amount of depreciation must be recorded in the register as a decline
➢ Now, navigate to the “Account” field
➢ In the end, complete the expense account to create the one that will be used to track depreciation.
Method 3: Manually Recording in QuickBooks Online
By using the Journal Entry option, users have the opportunity to manually record the assets for depreciation in QuickBooks Online. You may discover this tab by clicking the+New button. To access the first line of the Account drop-down, you must tap on it. Select the asset account that tracks the loan from here.
How to depreciate assets in QuickBooks is explained in the following steps:
➢ Head over to the accounting program
➢ Next, click on the+New button
➢ After that, select the “Journal Entry” tab
➢ Select the asset account that is used to track the loan from the “Account” pull-down menu’s first line
➢ The “Credits” field should be filled with the depreciated amount
➢ Move on to the second line and select the QuickBooks depreciation account you created from the “Account” drop-down menu.
➢ Type the corresponding depreciation amount in the Debits field.
➢ At last, click on the “Save” button.
Note: In QuickBooks Online, assets cannot be automatically registered for depreciation.
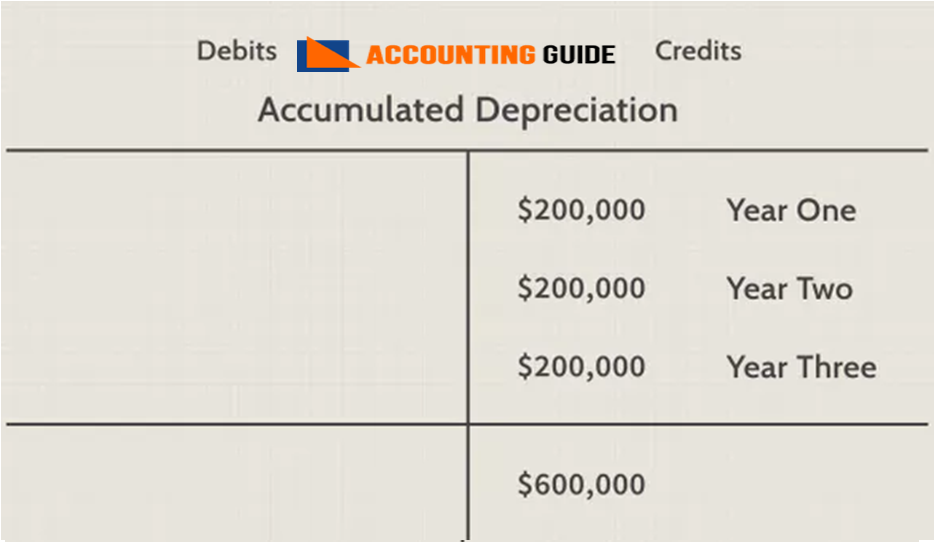
How to Record Accumulated Depreciation in QuickBooks Desktop?
When you have to find the net book value of an asset, you need to focus on its accumulated depreciation. For this, its account setup becomes vital. You must concentrate on an asset’s accumulated depreciation when determining its net book value. This makes setting up its account essential. The first step in setting it up is to make a new fixed asset account for each asset that you intend to depreciate. Additionally, you must put up two sub-accounts for each of the fixed asset accounts you have established.
Learn how to enter accumulated depreciation in QuickBooks Desktop by performing the procedure mentioned below:
➢ It is necessary to set up a new fixed asset account in QuickBooks
➢ Create an account for every asset that has to be depreciated
➢ There should also be two new sub-accounts
➢ Ensure that you include the sub-accounts for each new fixed asset account you create
➢ After that, you’re supposed to create an expense account
➢ The account may be given the name “Depreciation Expense”
➢ It needs to be made in order to keep track of depreciation expenses.
Conclusion
Well, this write-up taught you various methods to Record Calculate Depreciation in QuickBooks. Apart from that, you can also set up depreciation via various ways. Hopefully, with the above processes you can easily calculate your depreciation and complete your company’s accounting operations. In case, if you have any doubts or queries related to recording calculate depreciation QuickBooks, you can reach out the Team of Experts via QuickBooks Customer Helpdesk.
Frequently Asked Questions
How to Track Depreciation in QuickBooks?
There are two accounts are necessary in order to track asset depreciation in QuickBooks:
1 Depreciation Expense Account
2. Accumulated Depreciation Account
Depreciation Expense Account
The expenditures are tracked using this account. Here are the steps you must do to make it:
➢ Click the Chart of Accounts link under the Gear symbol
➢ Then click the+ New button that appears in the top right corner
➢ Choose the spending category that is listed underneath the other expense option
➢ Below the depreciation tab, provide the necessary information
➢ Give the depreciation you need to track a respectable name
➢ Pick it.
Start estimating depreciation using the manual diary entries as follows:
➢ Click the+New button that appears in the top-right corner of the screen
➢ Choose the relevant journal entry.
➢ When beginning to fill out the entry, the first line is used to indicate the depreciation expense account, which is displayed in the Account option
➢ The sum of the deductions you most recently added to the debit
➢ The account option that appears in the next line is where the asset’s value drop is recorded
➢ To enter the asset depreciation amount, press the credit button
➢ The entries have now been saved after completion.
Accumulated Depreciation Account
Maintaining the data on fixed assets is made possible by this account. The procedures are as follows:
➢ Go to the Gear icon
➢ Next, choose the Chart of Account
➢ Select New from the menu
➢ Locate the category button now, then select the Other Asset or Fixed Asset based on your needs
➢ Type in the appropriate descriptions for each asset that is listed in the list
➢ Choose and provide an appropriate account name
➢ If you choose to track asset depreciation after completing this step, a question will appear
➢ Mark the Yes button with a check-mark
➢ Depreciation can now be created in QuickBooks
➢ Next, fill up the appropriate boxes with the beginning charges
➢ To complete the procedure, select Finish.
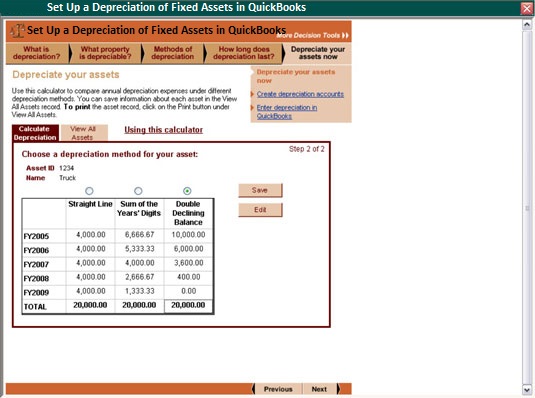
How to Use QuickBooks to Calculate Depreciation?
To determine the depreciation cost, use QuickBooks planning & budgeting option with decision tools. Depreciation doesn’t require money. It is a way to show the resource you are using.
➢ Fill out the data pertaining to fixed assets
➢ As soon as you enter asset information, the system will begin computing depreciation costs automatically using the double-declining balance approach and the straight-line method
➢ Choose the most appropriate technique from the three used by QuickBooks to calculate depreciation expenses
➢ After that, save the information about the asset you are referring to in order to record the depreciation charge for the chosen year at year’s end
➢ Before adding the data to compute depreciation expenditures, make sure your setup is specified.
How Do I Enter the Transactions in QuickBooks?
Initially, find the Gear icon. After that, click the journal entry. For the journal’s first line, decide on the depreciation amount. Write the amount of depreciation beneath the debit. The depreciation amount of the asset can be selected by clicking the second button on the second line. A depreciation amount can be shown underneath the list of credit options. Click the Save button to finish.