Learn how to set up messages in QuickBooks and other software. This step-by-step guide will show you how easy it is to set up messages with QuickBooks online.
Being a QuickBooks user, you should know the importance of Set up Messages in QuickBooks Online. In this article, we’ll guide you through all the necessary steps for how to set up a message in QuickBooks Online and the importance of this setup. Many times, it happens when users are confused with the procedure but don’t worry; you can get the right procedure to make your process easy and simple. However, QuickBooks has enough useful features to help you resolve multiple problems as well. All you have to do is follow the correct steps Set Up Messages in QuickBooks. So, stay tuned till the end of the article.
What is a Message in QuickBooks?
QuickBooks messages are used to communicate with the software. Messages can be sent between users in QuickBooks, or between the software and external applications. Messages can also be used to control the behavior of QuickBooks. In this article, we’ll discuss how to create and use messages in QuickBooks.
Importance of Delete & Set up Messages in QuickBooks Online
We need first understand why Set up Messages in QuickBooks Online is important. It takes some effort to craft a tailored message for our customers when we give them sales or invoice reports. The sales and invoice receipt that you send to customers will include that message. Making a personalised message is primarily done to express your gratitude to your clients and to provide them with additional payment-related information.
Here are the Actions you Must Take to Get the Set Up Messages in QuickBooks Tips
Why would you even consider creating messages on your QuickBooks Online? There must be a good reason why you should do it as we’ve discussed in the above paragraph. You mostly need to send invoices and sales reports to your clients while using the software.
But without the appropriate message attached, such an email appears incomplete. Setting a customised message also aids in bringing in and keeping customers. Additionally, a personalised message can be very useful in providing your consumer with additional details regarding your invoice. Set Up Messages in QuickBooks is therefore beneficial in the long run.
Step 1: Start by launching the QuickBooks accounting program
Step 2: Navigate to the software’s dashboard from the QuickBooks Online edition
Step 3: A gear icon can be found in the top-right corner and on the right side of the page
Step 4: Click that icon. The pop-up window will appear. Select “Account and settings” from the pop-up menu on that screen.
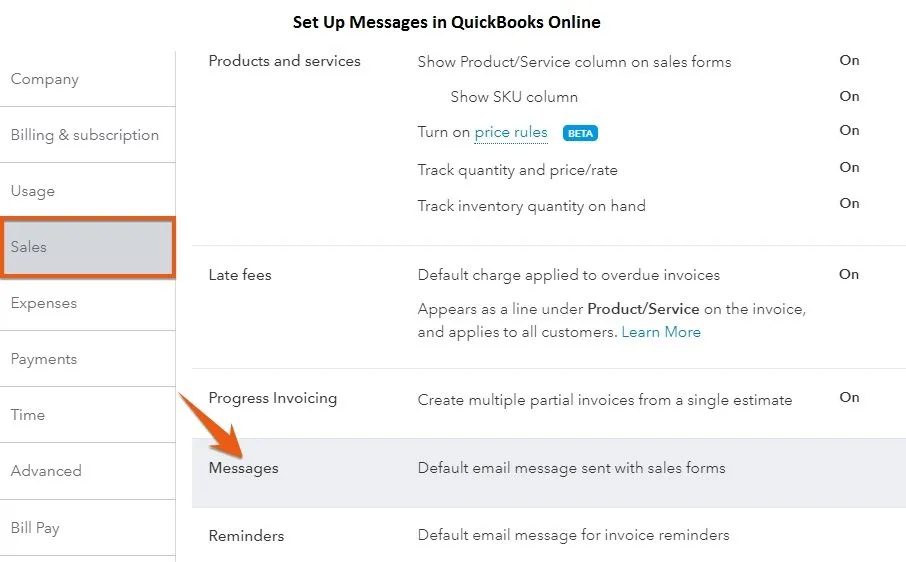
Step 5: After that, look for the “Sales” option on the left menu bar area. Select the option by clicking on it.
Step 6: You will find that there are many other options accessible on the dashboard once you have selected the “Sales” option
Find the “Messages” option among all of those. You are welcome to click anywhere in the “Messages” grey area
Step 7: You would have various options in the dialogue box. The required ones need to be filled out.
You would have the following options:
➣ Sales From
You must now choose an option from the provided drop-down box. You can modify your suggested message for client forms like the Credit Memo, Sales Receipt, Sales Receipt, Refund Receipt, Estimate, and Invoice in this section.
➣ Greetings
You must check the small box that has already been supplied in this option. Next, you must decide between “Dear” and “To” for the salutation. Additionally, you must choose how your customer’s name will appear, such as “[Full Name]”.
➣ Subject Line
Typically, QuickBooks offers its default subject line. You can, however, update it here. For simple track keeping, it is best to preserve the form numbers.
➣ Email Message
You’ll give your consumers the messages in this part. You can adjust your main mail messages in this section to suit your company’s needs. By selecting the button designated for it, you can always return to the default message.
➣ Copies (CC) New Invoice to Address
You can enter your email address after you have checked the box.
➣ Blind Copy (BCC) New Invoice to Address
The same procedure would be applied in this section. You can choose whether to provide an address or not.
➣ Sales From
You can omit any information from this field. This feature may appear pointless given that users may now customise messages for various forms.
➣ Cancel or Save
Click the Save button on the left if you believe that the statements, information, and messages you entered above are accurate and reflect your preferences. You would locate it toward the bottom of the page, and it would be green in colour.
Visit Details: QuickBooks Com Error Crash While Mailing Invoices
How to Set Up Messages in QuickBooks Online: Step by Step Procedure
How to Delete and Set up Messages in QuickBooks Online Steps
Total Time: 15 minutes
Steps to Customize your Set Up Messages in QuickBooks Online
Continue reading if you want instructions on how to use a template to personalise the remarks for each transaction.
➣ Initially, select the “Account and Settings” option
➣ Next, click on the Sales tab
➣ Then do a left-click on the “Customize look and feel” option
➣ You should now edit the document
➣ Select any form you want from the “Custom from styles” section once a new window has opened
➣ You would be given a number of possibilities, and you would only need to choose the one that best fits your needs
➣ You must select the “Edit” button after selecting an option
➣ It would open a new window
➣ Three options—Design, Content, and Emails are located at the top of the window
➣ To further modify, you must choose the third option named “Emails”
➣ The following step requires you to choose one of the following: further information, a summary of the information, or a PDF attachment
➣ You’d have to scroll down farther and fill in the other spaces because there would be further options available.
You would verify that anything you had marked as estimates in the previous step would appear as defaults in the edit section. And it has to line up. The estimate template would be updated with all the necessary adjustments you make in this particular section. Only one template is affected; none of the others are. Only when you wish to send tailored messages to a specific customer list is this step necessary.
Steps to Change or Edit the Message that is Emailed with Sales Form
➣ You must first log into your QuickBooks account before going to the Gear menu >>> Account and Setting >>> Company Setting
➣ Select “Sales” from the menu’s left-hand side
➣ To the right of the message, select the edit option
➣ You have the choice to choose the salutation in QuickBooks, as well as who you wish to address
➣ Any of the following options can be chosen after selecting Sales form from the drop-down menu
➣ You can then compose the email that you want your customer to receive
➣ Check the box that is indicated “Email me a copy”, if you’d want a copy of every email that was sent to customers, please email it to me
➣ At last, click on the “save” followed by clicking on the “Done” button.
Conclusion
Hopefully, you find this article useful in Set up Messages in QuickBooks Online. In case, if you stuck or facing difficulties while implementing the steps, you can feel free to reach out the Team of Experts using our QuickBooks Customer Helpdesk available 24*7 to resolve your queries or issues related to QuickBooks accounting software. In this article, we’ll show you how to set up messages in QuickBooks and other popular software so that you can easily communicate with your team. By following these simple steps, you’ll be able to keep everyone on the same page and ensure that all your transactions are recorded correctly.
Frequently Asked Questions
☞ How Do I Update Message Global for Invoice, Sale, Forms and Estimates in QuickBooks?
Here’s how to configure or modify the message for estimates, sales forms, and invoices globally:
➣ On the toolbar, click on the Gear button
➣ Select Account settings in your business
➣ From the left menu, select Sales
➣ In the Message section, click the Edit icon
➣ Then, insert the standard message for the clients under Blind Copy (Bcc) New copy to address, click on the Sales Form drop-down menu, and then pick the Invoices and Other Sales Form or Estimates option
➣ In the end, hit the Save and Done option.
Note: You are permitted to set up a unique default email message for every sales form. Click on the drop-down menu and choose the relevant option to modify the sales form’s type (Invoices, Estimates, Sales Receipts, Credit Notes, Statements).
You will need to manually adjust the message each time you create a sales form if you wish to change the default email message for each individual customer. On a customer-by-customer basis, you must edit the default message; to do this, click the Message Displayed on button.
See Also: How to Set Up Sales Tax in QuickBooks
☞ What is the Procedure Involved in Printing a Message on the Statement?
With the help of steps discussed below, you can print a message on the statement with ease:
➣ On your computer, start by opening a word processing program such as Microsoft Word.
➣ At the bottom of the page, start typing the message for your consumer after you’ve finished scrolling down.
➣ Print off the complete message page once you’ve finished composing the message for your customer.
➣ In order to print the statement on the same page as the message, you must then reload the paper into the printer.
➣ The message will be printed on the lower section of the page, while the statement portion is expected to be on the upper part. There won’t be any overlapping if the message is typed low enough.
➣ To ensure that there is no overlap between statement and message, this procedure involves a little trial and error. Once you have the ideal alignment, we advise you to store the settings so you can print statements more quickly the following time.
☞ How to Delete Customer Messages in QuickBooks?
To remove customer messages from QuickBooks, follow the procedures listed below:-
➣ First, pick the Lists menu, then click on the Customer and Vendor Profile Lists option
➣ Afterward, pick a message from the Customer Message List
➣ There are already five standard customer messages registered in QuickBooks. The Delete Customer Message option can be found by performing a right-click on any of the messages you want to remove.