With amazing features of QuickBooks online makes it simple for users to keep track of their business activity. One of QuickBooks’ most well-known features is the ability to instantly download the bank transactions. Additionally, users can connect their bank accounts and credit card accounts to QB. With this, they can immediately download mismatched or unmatched a transaction in QuickBooks Online. Moreover, the bank statements are automatically reconciled by QBO. It also helps you to save your time as entering and reconciling transactions takes too much of time. QB Online allows you to save time and effort as it eliminates the time-consuming task of data entry. This blog guides you all related facts and a quick process for how to unmatched a transaction in QuickBooks Online.
What does Unmatch a Transaction mean in QuickBooks Online?
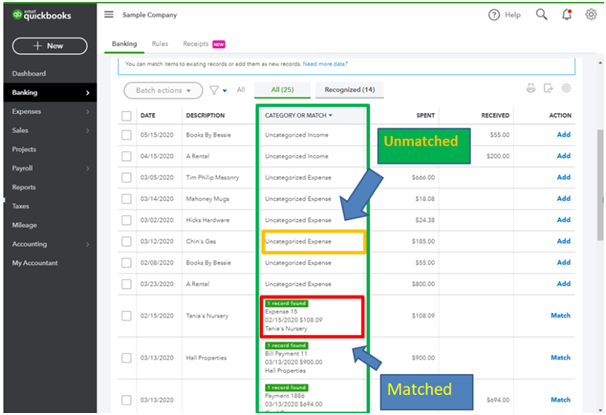
QuickBooks assigns a matched or mismatched status to each transaction downloaded from your bank or credit card account. The transaction is already present or has been entered if it has a matched status. QuickBooks online accumulates any transactions that aren’t matched.
This could be due to a variety of factors including corrupted bank transactions or incorrect matching methods. The transactions that aren’t matched are the ones that cause issues.
Also Read: How to Fix QuickBooks Online Running Slow
Related article: Guide to Create & Modify QuickBooks Memorized Transactions
2 Different Ways to Unmatch a Transaction in QuickBooks Online:
You can unmatched transaction using two ways either through Banking Page or the Bank Register. Let’s proceed with the steps that help you to unmatched downloaded transaction in QuickBooks Online:
From the Banking Page:
Below Steps Helps You to Unmatched a Single Transaction
💠 Initially, select the Banking menu from the left menu on the page
💠 From the panel, select the Banking option
💠 You also make sure that the correct bank or credit card account should be selected
💠 Now, move to the QuickBooks tab
💠 Choose the items that the user wish to Unmatch
💠 After that, select the common header to sort up or down by date, amount, description and so on
💠 With this, you can easily find the transaction
💠 Finally, click “Undo” within the action column
Step to Unmatched Multiple Transactions
💠 Verify each transaction which you want to Unmatch
💠 And then select the “Undo” tab in the date column
From Bank Register
💠 In the beginning, go to the Gear icon which is at the top of the page
💠 Next, select the “Chart of Accounts” under Settings
💠 Look for the account and then in the action column, select the “View Register”
💠 After that, choose the transaction and then hit the “Edit” tab
💠 At the top of the transaction, select a online transaction
💠 At last, click “Unmatch” on your next window screen.
It will go back to the review tab once unmatching of transactions is done. Users can categorize and rematch them there.
Steps to Delete the Downloaded Transactions in QuickBooks Online
Users can delete transactions using one of the two procedures for this activity. The following are two methods to delete a transaction in QuickBooks
From the Register
💠 First, go to the Gear icon and then select “Chart of Account” under the Settings
💠 Look for the account and then choose the option “View Register”
💠 Now, select all the unwanted transactions
💠 Next, in the transaction line, you have to click “Delete”
💠 Select the delete tab both to delete the transaction and downloaded transactions as well.
The deleted transaction will not show up in the transactions to be rematched.
From the Transaction Window
When you delete a transaction from the transaction window, it deletes both the transaction and the transaction that was downloaded. In the transaction list, these transactions will not be shown.
💠 Go to the Gear icon
💠 Select the “Chart of Account” under Settings
💠 Look for account and then select the option “View Register”
💠 Now, choose the unwanted transactions
💠 Click on the Edit menu on the transaction list
💠 Click “More” in the transaction dialogue box
💠 In the next window, you have to click the “Delete” tab
💠 At last, click “Ok” to confirm the process.
Conclusion:
The procedures to delete the downloaded transactions in QuickBooks are described in the above write-up, as well as “how to unmatch a transaction in QuickBooks online.” After reading this blog, we hope you will be able to delete and unmatched transactions without any hassle.
🔔 Frequently Asked Questions
Q1. Is it possible that I can unmatched transactions in QuickBooks Online mobile app?
Ans: Ans: Yes of course it’s possible to unmatched the transaction using your QBO mobile app. But make sure that your bank account is connected to QuickBooks Online. With the help steps, you can access the transactions in the application and do the require changes in it:
➤ First, sign in to QuickBooks Online mobile app
➤ Next, click Dashboard in the home page
➤ Scroll down to the Account Balances section
➤ Hit the account that are required to make changes
➤ Click the section “In QuickBooks”
➤ Finally, hit “Undo” and then “Confirm” for each transaction that you want to unmatch.
Q2. Can we unmatch a download transaction in QuickBooks?
Ans: You can unmatch a downloaded transaction in QB using these steps:
➤ Move to the Banking menu and then click “Banking”
➤ Choose tile for the bank or credit card account that you downloaded the transaction from
➤ Next, select the tab “Categorized”
➤ Now, look for the transaction that you want to unmatch
➤ Choose the blue transaction link within the “Added or Matched” column to verify the matched transaction
➤ At last, select “Undo” from the Action column.
Q3. How do I remove the duplicate transactions in Register mode?
Ans: Go to the Banking menu and select “Bank Feeds” >>> “Bank Feeds Center”. Search and select the statement from the items received from the Financial Institution section. After that, select the “View” tab and then match appropriate transactions. To match them, select “Done” and then select “Yes” in the Not Finished Matching screen. You’ll return to the Online Banking Center. Find and select the same statement from the Items Received from Financial Institution section. In the end, select Delete.